ok its about resolution preview, now about the tessellation problem, you can choose one of these 3 options or play around with each settings :
让我们谈谈镶嵌的问题,你可以选择这 3 个选项中的一个或三个都选来设置 :
1. before circular filleting an object, be sure your positional tolerance (in circular fillet option box) has been set to minimal value for better tessellation between two surfaces, you could set it to 0.010 (the default is 0.0100), and also you can change the tangent tolerance to about 0.0100, with this option and value, maya will create more tight connection between two surfaces.
1. 在 circular fillet 物体前,确认你的 positional tolerance( 在 circular fillet 选项里 ) 是否已经设置到最小的值,以便在两个要 fillet 的曲面中得到最好的结果,你可以设为 0.010( 缺省就是 0.010), 同样你也可以将 tangent tolerance 设为 0.0100, 在这种设置下, maya 可以在严谨的连接两个曲面 .
2. maya has built-in automatic nurbs tessellation check located in the render menu. if you want to render your nurbs scene, all you have to do is select all of your nurbs objects, go to the render menu and select set nurbs tessellation, apply this function, then render the scene, it will reduce the gaps automatically. this feature evaluates a set frame (s) and automatically determines the optimum tessellation settings, which results in smoother surfaces without over-tessellation (of course this saves time and memory).
2.maya 会自动创建 nurbs 曲面的镶嵌,你可以在 render menu 里查看它 . 如果你想渲染你的 nurbs 场景,你必需要做的是选择你所有的 nurbs 物体,到你的 render menu 里设置 nurbs 镶嵌,然后渲染场景,它可以减少缝隙 . 它会增加你的渲染时间和内存,但是可以使你的曲面平滑 .
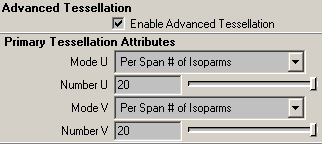
3. every time you're finished with fillet & trim, select your trimmed & filleted objects and set/turn on advanced tessellation and set number of uv to 20x20 (pic 14), and again, don't forget to set your render globals to production quality. it doesn't have to be 20x20, but i have found these to be good settings, but be carefull with this settings, the surfaces would very very smooth which increasing your rendering times.
3. 当你每次完成 fillet 和 trim 操作,选择已被 fillet 和 trim 过的物体设置它们的 advanced tessllation 属性,将 uv 设为 20x20(pic 14), 不要忘记在全局渲染里设置产品质量 . 虽然不一定要到 20x20, 但是我认为这是一个比较好的数值 , 请你注意使用这个方法,它会增加你的渲染时间 .

4. 如果遇上很糟糕的情况,你可以在两个表面连接的地方之间增加你的 isoparm.
but i suggest you to use no.1 and no.2
但我认为你会使用 no.1 和 no.2 来改善这种情况 .
anyway...please...don't be to much worried about these gaps/space ..:) --- 不要太担心这种情况 .
-----------------------------------------------
ha...still with me guys ?.....ok..let's continue our wheel lesson
circular fillet & trim (part 1)
important : you must turn on create curve on surface on circular fillet option box, otherwise you cannot trim the surface.
重要 : 在你 circular fillet 时,一定要在选项框中选择在表面创建曲线,否则你将不能剪切曲面 .
to circular fillet, select lofted/extruded object first, then select main body object, then circular fillet it, this would help us to remember the last settings of circular fillet directions.
cirular fillet 前,先选择 loft/extrude 的曲面,然后再选择主要的面, circular fillet 它们,这样会让我们记得 circular fillet
[1] [2] 下一页
新闻热点
疑难解答