前言
UITableView 是在app界面里非常常用的一个控件了,打开一个app,内容列表 作者列表 朋友圈列表等等,,,都离不开 UITableView 。
而 UITableView 的精髓,则是在 UITableViewCell 展现的, 最常用的 自定义cell 有的行高是固定的,而大部分 则需要根据内容来计算行高展示的。
下面就说说我在实际开发中处理cell行高的几种情况:
1. 不需要动态计算高度
我在写tableview时,基本都是自定义cell,而所有的自定义cell,都会继承一个基类BaseTableViewCell:
.h里:
.h里:// 重用标识+ (NSString *)reuseIdentifier;// cell高度+ (CGFloat)staticHeight;.m里:- (id)initWithStyle:(UITableViewCellStyle)style reuseIdentifier:(NSString *)reuseIdentifier { self = [super initWithStyle:style reuseIdentifier:reuseIdentifier]; if (self) { self.opaque = NO; self.selectionStyle = UITableViewCellSelectionStyleNone; } return self;}// 重用标识+ (NSString *)reuseIdentifier { return NSStringFromClass([self class]);}// cell高度+ (CGFloat)staticHeight { return 44.f;} 这样写的好处是,当我们在使用tableview时,会方便我们对重用标识符 行高使用,看一下:

staticHeight可以在子类的自定义cell里更改设置,使用时:

这样写,更能清晰明了的看到对每个自定义cell的设置,也会让代码看上去优雅整齐一些。
2. 动态计算高度
实际开发中,使用最多的应该是动态计算cell高度了,这也是tableView很基本的一个功能。
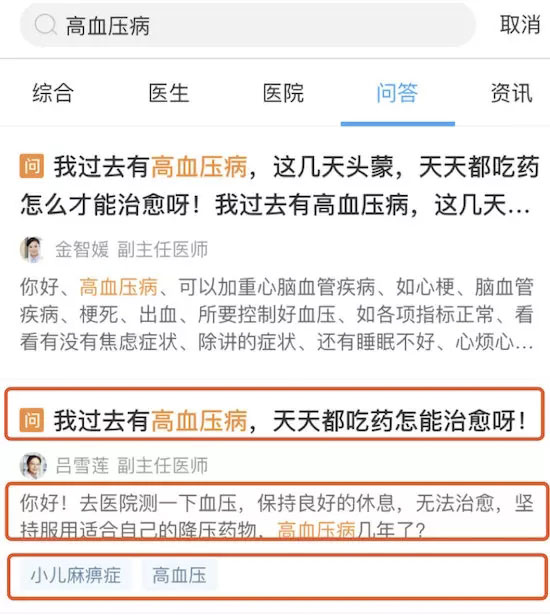
比如搜索资讯这块:

标题高度不固定,内容高度不固定,标签不固定,这样的就需要根据model里的内容计算行高了:

用的时候,在tableview的代理里设置:
- (CGFloat)tableView:(UITableView *)tableView heightForRowAtIndexPath:(NSIndexPath *)indexPath { WMSearchResultQAModel *model = self.dataArray[indexPath.row]; return [WMSearchResultQAModel calutWholeCellHeightWithModel:model];} 这样就可以达到每个cell根据内容展示不同高度的要求了。
这种方法很繁琐,但是也是最精确的,最可控的,都支持autolayout和frame。
3. 动态计算 - 缓存高度
为什么要缓存高度?
因为当tableView滚动时会不停的回调 heightForRowAtIndexPath 这个代理方法,当cell的高度需自适应内容时,就意味着每次回调这个方法时都要计算高度,而计算是要花时间了,在用户体验上的体现就是卡顿,众所周知 60fps是比较符合人眼审视的,如果帧数 低于这个数值过多,就会明显感受到卡帧等现象,为了让用户体验比较好些,我们就要对高度计算进行优化。
思路:为了避免重复且无意义的计算cell高度,缓存高度就显得尤为重要了。
缓存高度机制
缓存高度 我们需要一个容器来保存高度数值,可以是model 可以是一个可变数组 也可以是一个可变字典,以达到每当回调 heightForRowAtIndexPath 这个方法时,我们先去这个缓存里去取,如果有,就直接拿出来,如果没有,就计算高度,并且缓存起来。
以model为例:
在model里声明个cellHeight属性,用于保存Model所对应的Cell的高度,然后在 heightForRowAtIndexPath 方法中,如果当前Model的cellHeight为0,说明这个Cell没有缓存过高度,则计算Cell的高度,并把这个高度记录在Model中,这样下次再获取这个Cell的高度,就可以直接去Model中获取,而不用重新计算:
- (CGFloat)tableView:(UITableView *)tableView heightForRowAtIndexPath:(NSIndexPath *)indexPath { WMSearchResultQAModel *model = self.dataArray[indexPath.row]; if (model.cellHeight > 0) { // 有缓存的高度,取出缓存高度 return model.cellHeight; } // 没有缓存时,计算高度并缓存起来 CGFloat cellHeight; = [WMSearchResultQAModel calutWholeCellHeightWithModel:model]; // 缓存给model model.cellHeight = cellHeight; return cellHeight;} 这样就实现了高度缓存和Model、Cell都对应的优化,我们无需手动管理高度缓存,在添加和删除数据的时候,都是对Model在数据源中进行添加或删除。
而如果使用可变数组或可变字典时,则需要额外的在刷新tableView时对其进行清空处理。
4. 自适应高度
在 iOS8 之后,系统结合autolayout提供了动态结算行高的方法 UITableViewAutomaticDimension,做好约束,我们都不用去实现 heightForRowAtIndexPath 这个代理方法了。
masonry支持毫无压力。
实现步骤:
1、tableView设置
// 预设行高self.tableView.estimatedRowHeight = xxx;// 自动计算行高模式 self.tableView.rowHeight = UITableViewAutomaticDimension;
2、在自定义cell里,masonry布局,比如:
- (void)layoutSubviews { [super layoutSubviews]; [self.headImgView mas_makeConstraints:^(MASConstraintMaker *make) { make.top.left.offset(kSpace15); make.size.mas_equalTo(CGSizeMake(50.f, 50.f)); // 在自动计算行高模式下 要加上的 make.bottom.equalTo(self.contentView.mas_bottom).offset(-kSpace15); }]; [self.nickNameLabel mas_makeConstraints:^(MASConstraintMaker *make) { make.left.equalTo(self.headImgView.mas_right).offset(12.f); make.top.offset(17.f); }]; [self.jobWorkLabel mas_makeConstraints:^(MASConstraintMaker *make) { make.left.equalTo(self.nickNameLabel.mas_right).offset(8.f); make.right.lessThanOrEqualTo(self.contentView.mas_right).offset(-kSpace15); make.top.offset(21.f); }]; [self.hospitalLabel mas_makeConstraints:^(MASConstraintMaker *make) { make.left.equalTo(self.headImgView.mas_right).offset(12.f); make.top.equalTo(self.jobWorkLabel.mas_bottom).offset(6.f); }]; [self.line mas_makeConstraints:^(MASConstraintMaker *make) { make.left.right.bottom.offset(0); make.height.mas_equalTo(0.5f); }];} 布局时两个注意点:
· 所有子控件,都要依赖与self.contentView作为约束父控件,而不是self(cell)
· 关键控件要做bottom约束 (因为不再指定行高,所以要需要给出根据bottom的约束)
3、最关键的一步: [cell layoutIfNeeded]
- (UITableViewCell *)tableView:(UITableView *)tableView cellForRowAtIndexPath:(NSIndexPath *)indexPath { WMDoctorEvaluateDescribeInputCell *cell = [tableView dequeueReusableCellWithIdentifier:[WMDoctorEvaluateDescribeInputCell reuseIdentifier] forIndexPath:indexPath]; kWeakSelf cell.describeInputBlock = ^(NSString * _Nonnull describeText) { weakSelf.inputDescribeText = describeText; }; //关键的一步,解决不正常显示问题 [cell layoutIfNeeded]; return cell;} 这样就完成了自动适应高度的要求了。
另外:
针对一些自动适应高度不好做的cell,可以单独处理 如下:
- (CGFloat)tableView:(UITableView *)tableView heightForRowAtIndexPath:(NSIndexPath *)indexPath { if (indexPath.section == 2) { return [WMDoctorEvaluateStarCell staticHeight]; } return UITableViewAutomaticDimension;} 5.自适应高度 - 缓存行高
在用UITableViewAutomaticDimension,有的界面比较复杂,虽然这样能完成显示,但是在滑动的过程中,能肉眼感受到卡 掉帧,众所周知 60fps是比较符合人眼审视的,如果帧数 低于这个数值过多,就会明显感受到卡帧等现象,这属于优化性能方面的问题,所以就要思考一下怎样来达到优化tableview性能。
思路:
缓存高度机制
首先获取cell实际显示的高度
- (void)tableView:(UITableView *)tableView didEndDisplayingCell:(UITableViewCell *)cell forRowAtIndexPath:(NSIndexPath *)indexPath { NSString *key = [NSString stringWithFormat:@"%ld", (long)indexPath.row]; [self.heightDict setObject:@(cell.height) forKey:key]; NSLOG(@"第%@行的计算的最终高度是%f",key,cell.height);} //didEndDisplayingCell 当cell滑出屏幕时会触发此方法,是cell已经被真正的显示在了屏幕上,所以在这里打印出的高度必然是最正确的高度。根据indexPath.row作为key,将高度缓存进字典.
然后在 heightForRowAtIndexPath 方法里判断,如果字典里有值,则使用缓存高度,否则自动计算:
- (CGFloat)tableView:(UITableView *)tableView heightForRowAtIndexPath:(NSIndexPath *)indexPath{ NSString *key = [NSString stringWithFormat:@"%ld",indexPath.row]; if (self.heightDict[key] != nil) { NSNumber *value = _heightDict[key]; return value.floatValue; } return UITableViewAutomaticDimension;} 注意:设置cell的预估高度时一定要设置最小高度cell的那个值。不然的话,在滑动的时候,当高度最小的那个滑动到一大半的时候,就会突然一下消失,造成掉帧的现象。
总结
以上就是这篇文章的全部内容了,希望本文的内容对大家的学习或者工作具有一定的参考学习价值,如果有疑问大家可以留言交流,谢谢大家对VEVB武林网的支持。
注:相关教程知识阅读请移步到IOS开发频道。