前言
排序按钮是实际开发中比较常见的一种控件,最近我也遇到了,今天简单分享下。
虽然功能简单,但是保证你看了不亏,尤其是对UI这块比较薄弱的同学来说。
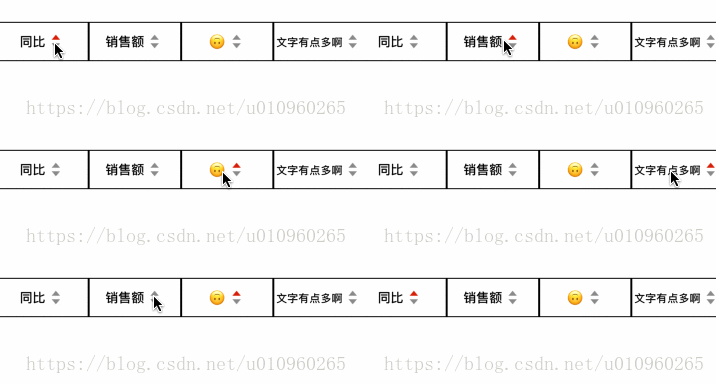
OK,先看图:

简单描述一下:
按钮一共有三种状态:非选中、选中升序、选中降序。

按钮的三种状态
点击按钮时有两种情况:
- 按钮原本处于非选中状态,点击,切换到选中状态,其状态变为升序。
- 按钮原本就处于选中状态,再点击一下,则切换其排序状态(升变降、降变升)。
不同状态对应不同的icon,如果没有UI,可以去iconfont 找图标,输入关键词如“上下箭头”就可以找到你需要的icon。
基本思路
继承UIButton,直接在button上放view,设置约束,根据按钮的状态设置对应的图片。
PS:自定义按钮最灵活的做法就是直接在button上放view(在不需要纠结内存和view层级的情况下),简单粗暴、随心所欲。
完整代码
.h文件:
#import <UIKit/UIKit.h>@interface CQSortButton : UIButton/** 按钮文本 */@property (nonatomic, copy) NSString *title;/** 是否是升序 */@property (nonatomic, assign, readonly, getter=isAscending) BOOL ascending;@end
.m文件:
#import "CQSortButton.h"@interface CQSortButton ()/** 文本label */@property (nonatomic, strong) UILabel *cq_titleLabel;/** 箭头imageView */@property (nonatomic, strong) UIImageView *cq_arrowImageView;@end@implementation CQSortButton#pragma mark - 构造方法- (instancetype)initWithFrame:(CGRect)frame { if (self = [super initWithFrame:frame]) { [self setupUI]; } return self;}#pragma mark - UI搭建- (void)setupUI { self.layer.borderColor = [UIColor blackColor].CGColor; self.layer.borderWidth = 1; // 文本和图片的父view UIView *contentView = [[UIView alloc] init]; [self addSubview:contentView]; contentView.userInteractionEnabled = NO; [contentView mas_makeConstraints:^(MASConstraintMaker *make) { make.top.bottom.centerX.mas_equalTo(self); make.left.mas_greaterThanOrEqualTo(self).mas_offset(3); make.right.mas_lessThanOrEqualTo(self).mas_offset(-3); }]; // 文本 self.cq_titleLabel = [[UILabel alloc] init]; [contentView addSubview:self.cq_titleLabel]; self.cq_titleLabel.font = [UIFont boldSystemFontOfSize:13]; self.cq_titleLabel.adjustsFontSizeToFitWidth = YES; [self.cq_titleLabel mas_makeConstraints:^(MASConstraintMaker *make) { make.top.bottom.left.mas_offset(0); }]; // 图片 self.cq_arrowImageView = [[UIImageView alloc] init]; [contentView addSubview:self.cq_arrowImageView]; self.cq_arrowImageView.image = [UIImage imageNamed:@"up_down"]; [self.cq_arrowImageView mas_makeConstraints:^(MASConstraintMaker *make) { make.size.mas_equalTo(CGSizeMake(20, 20)); make.centerY.mas_equalTo(contentView); make.left.mas_equalTo(self.cq_titleLabel.mas_right); make.right.mas_equalTo(contentView); }];}#pragma mark - 赋值选中状态- (void)setSelected:(BOOL)selected { //// 注意: //// selected 表示你要赋值的状态 //// super.selected 表示当前处于的状态 if (selected) { // 即将设置成选中状态 if (super.selected) { // 如果原本就处于选中状态 // 那么就切换筛选状态 _ascending = !_ascending; if (_ascending) { // 升序 self.cq_arrowImageView.image = [UIImage imageNamed:@"red_arrow_up"]; } else { // 降序 self.cq_arrowImageView.image = [UIImage imageNamed:@"red_arrow_down"]; } } else { // 如果之前不是选中状态 // 那么设置成选中的默认排序状态:升序 _ascending = YES; self.cq_arrowImageView.image = [UIImage imageNamed:@"red_arrow_up"]; } } else { // 即将设置成非选中状态 // 设置成非选中状态的图片 self.cq_arrowImageView.image = [UIImage imageNamed:@"up_down"]; } // 最后再赋值 [super setSelected:selected];}#pragma mark - 赋值文本- (void)setTitle:(NSString *)title { _title = title; self.cq_titleLabel.text = title;}@end 使用:
- (void)viewDidLoad { [super viewDidLoad]; // Do any additional setup after loading the view. NSArray *titleArray = @[@"同比", @"销售额", @"
注:相关教程知识阅读请移步到IOS开发频道。