每天学一点点Html5+Css3,慢慢积累经验,从基础做起。下面主要介绍一下绘制简单的播放器按钮;
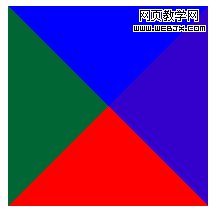
首先,看看当DIV的宽度和高度都为0的时候,设置边框成了什么样子?
代码如下:
1 <!DOCTYPE>
2 <html>
3 <head>
4 <meta charset="utf-8" />
5 <style>
6 .border{
7 width:0;
8 height:0;
9 border-bottom:100px #F00 solid;
10 border-top:100px #00F solid;
11 border-left:100px #063 solid;
12 border-right:100px #30C solid;
13 }
14 </style>
15 </head>
16 <body>
17 <div class="border"></div>
18 </body>
19 </html>
运行效果图如下:

那么,从这张图中我们可以看出点什么么?
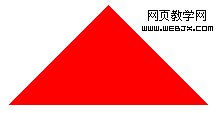
如果去掉其中的三个边框,我们是不是就可以绘制出三角形呢?答案是肯定的。一下代码就可以绘制出一个三角形:
1 <!DOCTYPE> 2 <html> 3 <head> 4 <meta charset="utf-8" /> 5 <style> 6 .border{ 7 width:0; 8 height:0; 9 border-bottom:100px #F00 solid;10 border-left:100px transparent solid;11 border-right:100px transparent solid;12 }13 </style>14 </head>15 <body>16 <div class="border"></div> 17 </body>18 </html>
效果:

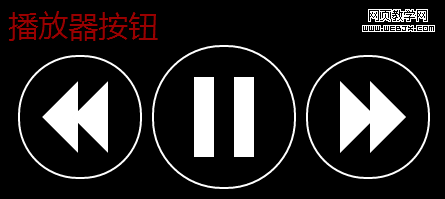
现在绘制出播放器的按钮就简单了,结合学习笔记一种的一些技巧,稍微变通一下上面绘制三角形的代码,很容易就可以画出最后的播放器按钮了。
代码如下:
1 <!DOCTYPE>
2 <html>
3 <head>
4 <meta charset="utf-8" />
5 <style>
6 body{
7 background:#000;
8 }
9 header{
10 font-family:"MicroSoft YaHei";
11 font-size:30px;
12 color:#990000;
13 }
14 .circle{
15 width:120px;
16 height:120px;
17 -webkit-border-radius:60px;
18 -moz-border-radius:60px;
19 border-radius:60px;
20 border:2px #FFF solid;
21 float:left;
22 margin:10px;
23 cursor:pointer;
24 }
25
26 .circle:hover,.circle1:hover{
27 -webkit-box-shadow:rgba(255,255,255,0.6) 0 0 15px;
28 -moz-box-shadow:rgba(255,255,255,0.6) 0 0 15px;
29 box-shadow:rgba(255,255,255,0.6) 0 0 15px;
30 }
31
32 .circle1{
33 width:140px;
34 height:140px;
35 -webkit-border-radius:70px;
36 -moz-border-radius:70px;
37 border-radius:70px;
38 border:2px #FFF solid;
39 float:left;
40 cursor:pointer;
41 }
42
43 .triangleRight{
44 width: 0;
45 height: 0;
46 border-left: 60px solid #FFF;
47 border-top: 30px solid transparent;
48 border-bottom: 30px solid transparent;
49 -webkit-transform:scale(0.6,1.2);
50 -moz-transform:scale(0.6,1.2);
51 transform:scale(0.6,1.2);
52 }
53 .next1{
54 margin:30px -10px 0 20px;
55 float:left;
56 }
57 .next2{
58 margin:30px 0 0 -20px;
59 float:left;
60 }
61
62 .triangleleft{
63 width: 0;
64 height: 0;
65 border-Right: 60px solid #FFF;
66 border-top: 30px solid transparent;
67 border-bottom: 30px solid transparent;
68 -webkit-transform:scale(0.6,1.2);
69 -moz-transform:scale(0.6,1.2);
70 transform:scale(0.6,1.2);
71 }
72 .pre1{
73 margin:30px -10px 0 10px;
74 float:left;
75 }
76 .pre2{
77 margin:30px 0 0 -20px;
78 float:left;
79 }
80
81 .pause{
82 width:20px;
83 height:80px;
84 background:#FFF;
85 float:left;
86 }
87 .pause1{
88 margin:30px 10px 0 40px;
89 }
90 .pause2{
91 margin:30px 10px 0 10px;
92 }
93 </style>
94 </head>
95 <body>
96 <header>播放器按钮</header><section>
97 <div class="circle">
98 <div class="triangleLeft pre1"></div>
99 <div class="triangleLeft pre2"></div>
100 </div>
101 <div class="circle1">
102 <div class="pause pause1"></div>
103 <div class="pause pause2"></div>
104 </div>
105 <div class="circle">
106 <div class="triangleRight next1"></div>
107 <div class="triangleRight next2"></div>
108 </div>
109 </section>
110 </body>
111 </html>
效果:

总结:这个简单的实例主要应用了利用边框绘制三角形,稍微变换,比如改变边框的宽度或者div的尺寸,就可以绘制出其他的一些基本的图形。此外,还利用了CSS3中的圆角,阴影,图形变换。
新闻热点
疑难解答