使用excel文件导入数据,整合mongodb实现打卡签到系统
环境参数
实现步骤如下:
1.添加依赖
<dependency> <groupId>org.springframework.boot</groupId> <artifactId>spring-boot-starter-web</artifactId> </dependency> <dependency> <groupId>org.springframework.boot</groupId> <artifactId>spring-boot-starter-data-mongodb</artifactId> </dependency> <dependency> <groupId>org.projectlombok</groupId> <artifactId>lombok</artifactId> <optional>true</optional> </dependency> <!-- excel工具 --> <dependency> <groupId>org.apache.poi</groupId> <artifactId>poi-ooxml</artifactId> <version>4.0.1</version> </dependency> <dependency> <groupId>org.springframework.boot</groupId> <artifactId>spring-boot-starter-test</artifactId> <scope>test</scope> <exclusions> <exclusion> <groupId>org.junit.vintage</groupId> <artifactId>junit-vintage-engine</artifactId> </exclusion> </exclusions> </dependency> <dependency> <groupId>junit</groupId> <artifactId>junit</artifactId> <scope>test</scope> </dependency>
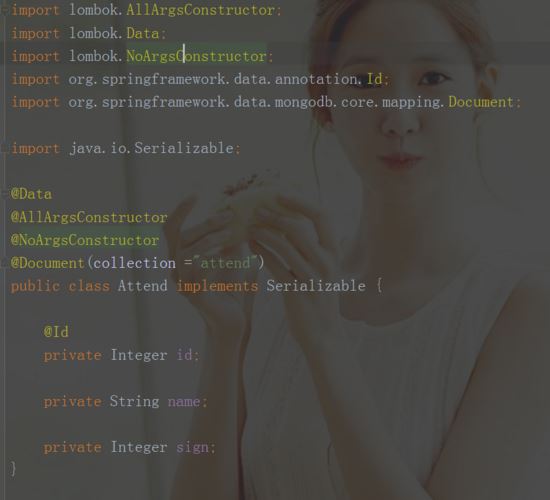
2.实体层
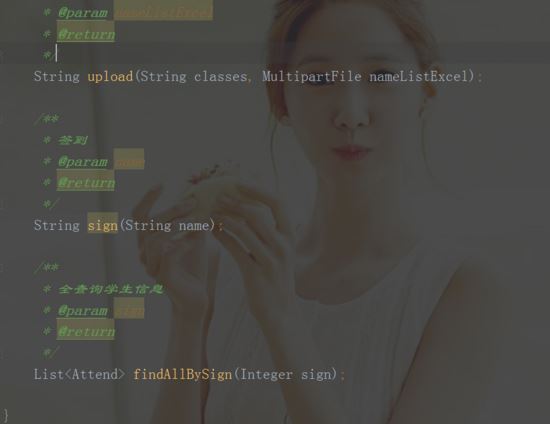
3.业务service层
4. service实现层
package com.ckf.mongodb_punch.service.impl; import com.ckf.mongodb_punch.mapper.AttendRepository; import com.ckf.mongodb_punch.entity.Attend; import com.ckf.mongodb_punch.service.AttendService; import org.apache.poi.hssf.usermodel.HSSFRow; import org.apache.poi.hssf.usermodel.HSSFSheet; import org.apache.poi.hssf.usermodel.HSSFWorkbook; import org.springframework.beans.factory.annotation.Autowired; import org.springframework.data.mongodb.core.MongoTemplate; import org.springframework.data.mongodb.core.query.Criteria; import org.springframework.data.mongodb.core.query.Query; import org.springframework.data.mongodb.core.query.Update; import org.springframework.stereotype.Service; import org.springframework.web.multipart.MultipartFile; import java.io.IOException; import java.util.ArrayList; import java.util.List; @Service public class AttendServiceImpl implements AttendService { @Autowired private AttendRepository attendRepository; @Autowired private MongoTemplate mongoTemplate; /** * 上传文件 * @param classes * @param nameListExcel * @return */ @Override public String upload(String classes, MultipartFile nameListExcel) { String result = "no"; if (nameListExcel == null) { return result; } //实例化对象列表,用于存储Excel中的数据 List<Attend> attendList = new ArrayList<Attend>(); //读取文件对象nameListExcel 中的数据(读取Excel中每一行数据,存到对象,存到对象列表中) try { //根据路径获取这个操作excel的实例 HSSFWorkbook wb = new HSSFWorkbook(nameListExcel.getInputStream()); //根据页面index 获取sheet页 HSSFSheet sheet = wb.getSheetAt(0); HSSFRow row = null; //循环sesheet页中数据从第二行开始,第一行是标题 for (int i = 1; i < sheet.getPhysicalNumberOfRows(); i++) { //获取每一行数据 row = sheet.getRow(i); Attend attend = new Attend(); //下面cellnum对应着下标,id是第一位对应着下标为0,name是第二位对应的下标为1,等等.. attend.setId(Integer.valueOf((int) row.getCell(0).getNumericCellValue())); attend.setName(row.getCell(1).getStringCellValue()); attend.setSign(Integer.valueOf((int) row.getCell(2).getNumericCellValue())); attendList.add(attend); } } catch (IOException e) { e.printStackTrace(); } System.out.println("解析Excel中的数据:" + attendList); /** * 如果成功就,写入mongodb中 */ attendRepository.saveAll(attendList); result = "ok"; return result; } /** * 签到 * @param name * @return */ @Override public String sign(String name) { Query query = Query.query(Criteria.where("name").is(name)); //局部修改的内容 Update update = new Update(); update.set("sign", 1); //attend 集合名 对应实体的集合名 mongoTemplate.updateFirst(query, update, "attend"); return "ok"; } /** * 全查询学生信息 * @param sign * @return */ @Override public List<Attend> findAllBySign(Integer sign) { return attendRepository.findAllBySign(sign); } }5.controller层
package com.ckf.mongodb_punch.controller; import com.ckf.mongodb_punch.entity.Attend; import com.ckf.mongodb_punch.service.AttendService; import org.springframework.beans.factory.annotation.Autowired;import org.springframework.web.bind.annotation.GetMapping;import org.springframework.web.bind.annotation.PostMapping;import org.springframework.web.bind.annotation.RestController; import org.springframework.web.multipart.MultipartFile; import java.util.HashMap; import java.util.List; import java.util.Map; @RestController public class AttendController{ @Autowired private AttendService attendService;@GetMapping("/sign") public String sign(String name){ /** * 将名字传给服务层,mongodb修改登录状态 */ attendService.sign(name); return "ok"; } /** * 上传文件 * @param classes * @param nameListExcel * @return */ @PostMapping("/upload") public String upload(String classes, MultipartFile nameListExcel){/** * 接收到前台传过来的文件对象,交给service层或者Excel工具类来解析数据* System.out.println("接收前台表单提交数据:"+classes+nameListExcel);*/ String result = attendService.upload(classes,nameListExcel);return result;} /** * 查询未签到同学 和已签到同学* @return */ @GetMapping("/list")public Map list(){ Map result = new HashMap<String,Object>(); /** * 已签到 */ List<Attend> complete = attendService.findAllBySign(1);result.put("complete",complete); /** * 未签到 */ List<Attend> incomplete = attendService.findAllBySign(0);result.put("incomplete",incomplete); return result;} }6.application.yml
这里使用的是mongodb的安全认证配置
spring: data: mongodb: uri: mongodb://ckf_user:123456@192.168.85.154:27017/attend_db
默认单例配置如下
spring: data: mongodb: uri:mongodb://localhost:27017/attend_db
这里使用的是异步实现的
7.list.html
代码如下
<!DOCTYPE html><html lang="en"><head> <meta charset="UTF-8"> <title>考勤管理页面</title> <style> #complete,#incomplete{ width: 50%; float: left; } </style> <script src="http://apps.bdimg.com/libs/jquery/2.1.1/jquery.min.js" type="text/javascript" charset="utf-8"></script></head><body> <h3>导入名单</h3> 班级名称: <input type="text" name="classes" id="classes"/> 请选择导入文件 <input type="file" name="nameList" id="nameList"/> <input type="button" id="upload" value="上传"> <hr/> <div id="incomplete"> <h3>未签到的</h3> <p></p> </div> <div id="complete"> <h3>已签到</h3> <p></p> </div></body><script type="text/javascript"> $(function () { //初始化页面查询结果 $.ajax({ type:"get", url:"/list", success:function(data){ console.log(data); var complete =""; var incomplete =""; $.each(data.complete,function (index,object) { complete += object.id +" " +object.name +"<br/>"; }) $("#complete p").html(complete); $.each(data.incomplete,function (index,object) { incomplete += object.id +" " +object.name +"<br/>"; }) $("#incomplete p").html(incomplete); } }); $("body").on("click","#upload",function(){ //将数据打包到formData对象中 var formData = new FormData(); formData.append("classes",$("#classes").val()); formData.append("nameListExcel",$("#nameList")[0].files[0]); $.ajax({ type:"post", url:"/upload", //dataType:"json", data:formData, processData: false, contentType: false, success:function(data){ console.log(data); if(data=="ok"){ alert("上传成功,即将刷新页面") //刷新当前页面 location.reload(); }else { alert("上传失败,请重新上传") } } }); }) }) </script></html>签到打卡代码如下:
8.sign-in.html
<!DOCTYPE html><html lang="en"><head> <meta charset="UTF-8"> <title>签到页面</title> <script src="http://apps.bdimg.com/libs/jquery/2.1.1/jquery.min.js" type="text/javascript" charset="utf-8"></script></head><body> 请输入你的姓名:<input type="text" id="name"/> <input type="button" id="sign" value="签到"/></body><script type="text/javascript"> $(function () { $("body").on("click","#sign",function(){ $.ajax({ type:"get", url:"/sign", data:{"name":$("#name").val()}, success:function(data){ console.log(data); if(data=="ok"){ alert("签到成功,返回签到页面") //刷新当前页面 location.reload(); }else { alert("签到成功,请重新签到") } } }); }) }) </script></html>list.html页面效果图

工作表效果图
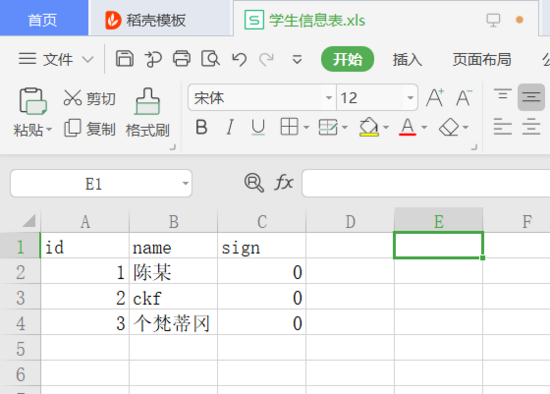
远程工具查询刚导入的数据如下 数据后面有包的路径是因为导入数据的时候没有添加mongodb配置类,添加了就没有了。
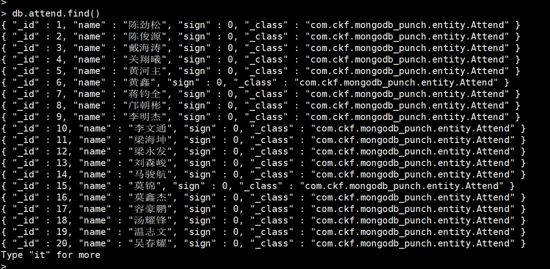
添加配置类之后的效果图
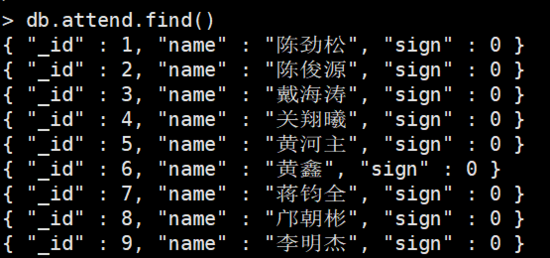
注意:导入excel文件(xsl工作表)的时候使用2003之前版本的,后缀带XLS。
有哪里不明白的地方记得下方留言哦。
项目已托管码云
地址:https://gitee.com/ckfeng/mongodb_punch.git
总结
到此这篇关于使用Mongodb实现打卡签到系统的文章就介绍到这了,更多相关使用Mongodb实现打卡签到系统内容请搜索武林网以前的文章或继续浏览下面的相关文章希望大家以后多多支持武林网!
新闻热点
疑难解答