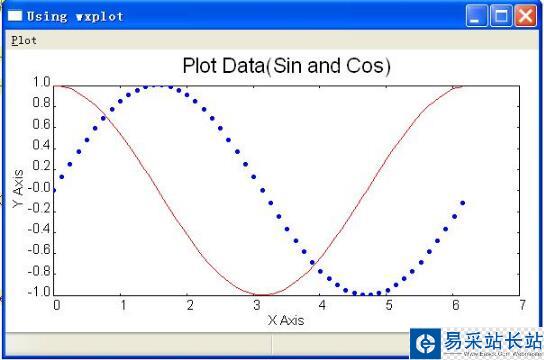
本文实例为大家分享了wxPython绘图模块wxPyPlot实现数据可视化的具体代码,供大家参考,具体内容如下
#-*- coding: utf-8 -*- ################################################################################## 使用wxPython的绘图模块wxPyPlot,需要数据可视化的时候,无需再借用其他的库或模块了################################################################################import numpyimport wximport wx.lib.plot as wxPyPlot #导入绘图模块,并命名为wxPyPlot #---------------------------------------------------------------------------# 需要把数据封装进入MyDataObject中def MyDataObject(): # 50 个点的sin函数,用蓝色圆点表示 data1 = 2.*numpy.pi*numpy.arange(100)/100. data1.shape = (50, 2) data1[:,1] = numpy.sin(data1[:,0]) markers = wxPyPlot.PolyMarker(data1, legend='Green Markers', colour='blue', marker='circle',size=1) # 50个点的cos函数,用红色表示 data2 = 2.*numpy.pi*numpy.arange(100)/100. data2.shape = (50,2) data2[:,1] = numpy.cos(data2[:,0]) lines = wxPyPlot.PolySpline(data2, legend= 'Red Line', colour='red') GraphTitle="Plot Data(Sin and Cos)" return wxPyPlot.PlotGraphics([markers, lines],GraphTitle, "X Axis", "Y Axis")#-----------------------------------------------------------------------------class TestFrame1(wx.Frame): def __init__(self, parent=None, id=wx.ID_ANY, title="Using wxPyPlot"): wx.Frame.__init__(self, parent, id, title,size=(600, 400)) # 创建菜单栏 self.mainmenu = wx.MenuBar() menu = wx.Menu() menu.Append(100, 'Draw1', 'Draw plots1') self.Bind(wx.EVT_MENU,self.OnPlotDraw1, id=100) self.mainmenu.Append(menu, '&Plot') self.SetMenuBar(self.mainmenu) # 创建状态栏,显示信息 self.CreateStatusBar(2) self.pc = wxPyPlot.PlotCanvas(self) #此处导入绘图面板 def OnPlotDraw1(self, event): #绘图函数 self.pc.Draw(MyDataObject()) ############################################################################# 测试wxPyPlot的代码###########################################################################if __name__=='__main__': app = wx.App() tf=TestFrame1(None) tf.Show() app.MainLoop()

以上就是本文的全部内容,希望对大家的学习有所帮助,也希望大家多多支持武林站长站。
新闻热点
疑难解答