今天,在在使用 pycharm 的使用,进行创建 python的时候,发现使用默认的创建的选项使用的python 3环境 。而我系统默认的python环境是 python 2.7 环境;这就引起了我的兴趣。
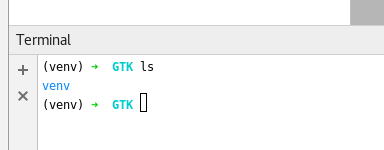
我打开pycharm 的终端,发现:

前面 有个 venv 参数,通过 调研了一番我发现:python 的 venv 模块可以创建一个独立的虚拟的python运行环境,这样就和系统的python独立开来了。而我使用fedora 28的系统,默认安装了python2.7 和 python3.6 两种python环境。
我们使用 python 内置的文档查看,venv 相关,其描述为:
Help on package venv:
NAME
venv - Virtual environment (venv) package for Python. Based on PEP 405.
我们使用python3 查看 venv 模块的使用方法:
➜ env pwd/home/xuyaowen/Desktop/workplace/env➜ env python3 -m venv -husage: venv [-h] [--system-site-packages] [--symlinks | --copies] [--clear] [--upgrade] [--without-pip] [--prompt PROMPT] ENV_DIR [ENV_DIR ...]Creates virtual Python environments in one or more target directories.positional arguments: ENV_DIR A directory to create the environment in.optional arguments: -h, --help show this help message and exit --system-site-packages Give the virtual environment access to the system site-packages dir. --symlinks Try to use symlinks rather than copies, when symlinks are not the default for the platform. --copies Try to use copies rather than symlinks, even when symlinks are the default for the platform. --clear Delete the contents of the environment directory if it already exists, before environment creation. --upgrade Upgrade the environment directory to use this version of Python, assuming Python has been upgraded in-place. --without-pip Skips installing or upgrading pip in the virtual environment (pip is bootstrapped by default) --prompt PROMPT Provides an alternative prompt prefix for this environment.Once an environment has been created, you may wish to activate it, e.g. bysourcing an activate script in its bin directory.
通过上面的介绍,我们大致知道 venv 的模块使用方法:
首先我们创建虚拟环境:
➜ venvtest pwd/home/xuyaowen/Desktop/workplace/venvtest➜ venvtest python3 -m venv .
我们查看创建的结果:
➜ venvtest lsbin include lib lib64 pyvenv.cfg➜ venvtest ll *lrwxrwxrwx. 1 xuyaowen xuyaowen 3 Jul 27 11:44 lib64 -> lib-rw-r--r--. 1 xuyaowen xuyaowen 69 Jul 27 11:44 pyvenv.cfgbin:total 32K-rw-r--r--. 1 xuyaowen xuyaowen 2.2K Jul 27 11:44 activate-rw-r--r--. 1 xuyaowen xuyaowen 1.3K Jul 27 11:44 activate.csh-rw-r--r--. 1 xuyaowen xuyaowen 2.4K Jul 27 11:44 activate.fish-rwxr-xr-x. 1 xuyaowen xuyaowen 271 Jul 27 11:44 easy_install-rwxr-xr-x. 1 xuyaowen xuyaowen 271 Jul 27 11:44 easy_install-3.6-rwxr-xr-x. 1 xuyaowen xuyaowen 243 Jul 27 11:44 pip-rwxr-xr-x. 1 xuyaowen xuyaowen 243 Jul 27 11:44 pip3-rwxr-xr-x. 1 xuyaowen xuyaowen 243 Jul 27 11:44 pip3.6lrwxrwxrwx. 1 xuyaowen xuyaowen 7 Jul 27 11:44 python -> python3lrwxrwxrwx. 1 xuyaowen xuyaowen 16 Jul 27 11:44 python3 -> /usr/bin/python3include:total 0lib:total 4.0Kdrwxr-xr-x. 3 xuyaowen xuyaowen 4.0K Jul 27 11:44 python3.6
我们当前 产生了很多虚拟环境相关的文件:
../venvtest├── bin│ ├── activate 用来激活虚拟环境│ ├── activate.csh│ ├── activate.fish│ ├── easy_install│ ├── easy_install-3.6│ ├── pip│ ├── pip3│ ├── pip3.6│ ├── python -> python3│ └── python3 -> /usr/bin/python3├── include├── lib│ └── python3.6│ └── site-packages├── lib64 -> lib└── pyvenv.cfg
默认情况下,是创建 一个全新的python执行环境,并包含pip命令,当你激活虚拟环境后,我们可以 使用 pip 安装我们需要的第三方包并且新安装的包不在系统中出现。下面我们进行激活环境:
➜ venvtest source ./bin/activate(venvtest) ➜ venvtest
前面出现 虚拟环境的名称,说明我们环境激活成功,这时候我们再进行运行python :
(venvtest) ➜ venvtest python -VPython 3.6.5
可以发现,此时我们的python的环境为 3.6.5, 虚拟环境运行成功。当然你也可以在创建虚拟环境的时候使用--system-site-packages选项,来让虚拟环境使用系统的已经安装的包。
我们进一步阅读 activate 脚本:
(venvtest) ➜ bin cat activate | head -n 2# This file must be used with "source bin/activate" *from bash*# you cannot run it directly
你会发现,它前两行说明,你只能使用 source 命令来激活它。
好了,到这里大致会使用 venv 模块了。希望你使用愉快。
以上就是本文的全部内容,希望对大家的学习有所帮助,也希望大家多多支持VEVB武林网。
注:相关教程知识阅读请移步到python教程频道。