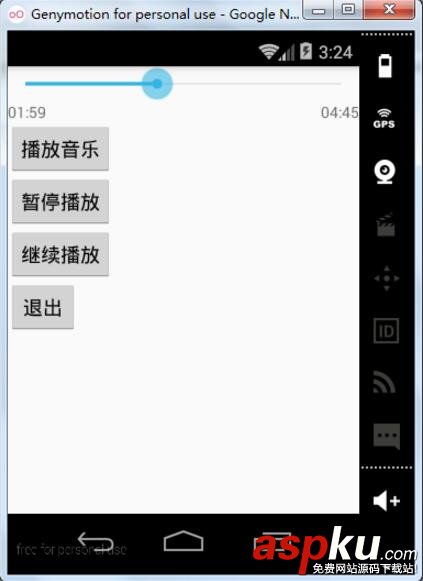
音乐播放器是一个非常常见的应用,这篇博客就是介绍如何制作一个简单的音乐播放器,这款音乐播放器具有以下的功能:播放歌曲、暂停播放歌曲、、显示歌曲的总时长、显示歌曲的当前播放时长、调节滑块可以将歌曲调节到任何时间播放、退出音乐播放器。
实现效果如下

实现方式:
第一步:使用Android Studio创建一个Android工程,并且修改activity_main.xml文件
<?xml version="1.0" encoding="utf-8"?> <LinearLayout xmlns:android="http://schemas.android.com/apk/res/android" xmlns:tools="http://schemas.android.com/tools" android:layout_width="match_parent" android:layout_height="match_parent" tools:context="com.fyt.musicplayer.MainActivity" android:orientation="vertical"> <!--显示播放进度--> <SeekBar android:id="@+id/sb" android:layout_width="match_parent" android:layout_height="wrap_content" /> <RelativeLayout android:layout_width="match_parent" android:layout_height="wrap_content"> <!--显示当前进度--> <TextView android:id="@+id/tv_progress" android:layout_width="wrap_content" android:layout_height="wrap_content" android:text="00:00"/> <!--显示总进度--> <TextView android:id="@+id/tv_total" android:layout_width="wrap_content" android:layout_height="wrap_content" android:layout_alignParentRight="true" android:text="00:00"/> </RelativeLayout> <Button android:layout_width="wrap_content" android:layout_height="wrap_content" android:text="播放音乐" android:onClick="play"/> <Button android:layout_width="wrap_content" android:layout_height="wrap_content" android:text="暂停播放" android:onClick="pausePlay"/> <Button android:layout_width="wrap_content" android:layout_height="wrap_content" android:text="继续播放" android:onClick="continuePlay"/> <Button android:layout_width="wrap_content" android:layout_height="wrap_content" android:text="退出" android:onClick="exit"/> </LinearLayout>
第二步:新建一个MusicService.java文件,用于处理音乐播放的逻辑
package com.fyt.musicplayer; import android.app.Service; import android.content.Intent; import android.media.MediaPlayer; import android.os.Binder; import android.os.Bundle; import android.os.IBinder; import android.os.Message; import android.support.annotation.Nullable; import java.io.IOException; import java.util.Timer; import java.util.TimerTask; //创建一个继承自服务的音乐服务类 public class MusicService extends Service { private MediaPlayer player; private Timer timer; //绑定服务时,调用此方法 @Nullable @Override public IBinder onBind(Intent intent) { return new MusicControl(); } //创建播放音乐的服务 @Override public void onCreate() { super.onCreate(); //创建音乐播放器对象 player = new MediaPlayer(); } //销毁播放音乐服务 @Override public void onDestroy() { super.onDestroy(); //停止播放音乐 player.stop(); //释放占用的资源 player.release(); //将player置为空 player = null; } //播放音乐 public void play() { try { if(player == null) { player = new MediaPlayer(); } //重置 player.reset(); //加载多媒体文件 player.setDataSource("sdcard/zxmzf.mp3"); //准备播放音乐 player.prepare(); //播放音乐 player.start(); //添加计时器 addTimer(); } catch (IOException e) { e.printStackTrace(); } } //暂停播放音乐 public void pausePlay() { player.pause(); } //继续播放音乐 public void continuePlay() { player.start(); } //创建一个实现音乐接口的音乐控制类 class MusicControl extends Binder implements MusicInterface { @Override public void play() { MusicService.this.play(); } @Override public void pausePlay() { MusicService.this.pausePlay(); } @Override public void continuePlay() { MusicService.this.continuePlay(); } @Override public void seekTo(int progress) { MusicService.this.seekTo(progress); } } //设置音乐的播放位置 public void seekTo(int progress) { player.seekTo(progress); } //添加计时器用于设置音乐播放器中的播放进度 public void addTimer() { //如果没有创建计时器对象 if(timer == null) { //创建计时器对象 timer = new Timer(); timer.schedule(new TimerTask() { //执行计时任务 @Override public void run() { //获得歌曲总时长 int duration = player.getDuration(); //获得歌曲的当前播放进度 int currentPosition = player.getCurrentPosition(); //创建消息对象 Message msg = MainActivity.handler.obtainMessage(); //将音乐的播放进度封装至消息对象中 Bundle bundle = new Bundle(); bundle.putInt("duration", duration); bundle.putInt("currentPosition", currentPosition); msg.setData(bundle); //将消息发送到主线程的消息队列 MainActivity.handler.sendMessage(msg); } }, //开始计时任务后的5毫秒,第一次执行run方法,以后每500毫秒执行一次 5, 500); } } } 第三步:创建一个MusicInterface.java文件创建用于操作音乐播放的接口
package com.fyt.musicplayer; //创建一个音乐播放接口 public interface MusicInterface { //播放音乐 void play(); //暂停播放音乐 void pausePlay(); //继续播放音乐 void continuePlay(); //修改音乐的播放位置 void seekTo(int progress); } 第四步:修改MainActivity.java文件
package com.fyt.musicplayer; import android.app.Activity; import android.content.ComponentName; import android.content.Intent; import android.content.ServiceConnection; import android.os.Bundle; import android.os.Handler; import android.os.IBinder; import android.os.Message; import android.view.View; import android.widget.SeekBar; import android.widget.TextView; public class MainActivity extends Activity { MyServiceConn conn; Intent intent; MusicInterface mi; //用于设置音乐播放器的播放进度 private static SeekBar sb; private static TextView tv_progress; private static TextView tv_total; @Override protected void onCreate(Bundle savedInstanceState) { super.onCreate(savedInstanceState); setContentView(R.layout.activity_main); tv_progress = (TextView) findViewById(R.id.tv_progress); tv_total = (TextView) findViewById(R.id.tv_total); //创建意图对象 intent = new Intent(this, MusicService.class); //启动服务 startService(intent); //创建服务连接对象 conn = new MyServiceConn(); //绑定服务 bindService(intent, conn, BIND_AUTO_CREATE); //获得布局文件上的滑动条 sb = (SeekBar) findViewById(R.id.sb); //为滑动条添加事件监听 sb.setOnSeekBarChangeListener(new SeekBar.OnSeekBarChangeListener() { //当滑动条中的进度改变后,此方法被调用 @Override public void onProgressChanged(SeekBar seekBar, int progress, boolean fromUser) { } //滑动条刚开始滑动,此方法被调用 @Override public void onStartTrackingTouch(SeekBar seekBar) { } //当滑动条停止滑动,此方法被调用 @Override public void onStopTrackingTouch(SeekBar seekBar) { //根据拖动的进度改变音乐播放进度 int progress = seekBar.getProgress(); //改变播放进度 mi.seekTo(progress); } }); } //创建消息处理器对象 public static Handler handler = new Handler(){ //在主线程中处理从子线程发送过来的消息 @Override public void handleMessage(Message msg) { //获取从子线程发送过来的音乐播放的进度 Bundle bundle = msg.getData(); //歌曲的总时长(毫秒) int duration = bundle.getInt("duration"); //歌曲的当前进度(毫秒) int currentPostition = bundle.getInt("currentPosition"); //刷新滑块的进度 sb.setMax(duration); sb.setProgress(currentPostition); //歌曲的总时长 int minute = duration / 1000 / 60; int second = duration / 1000 % 60; String strMinute = null; String strSecond = null; //如果歌曲的时间中的分钟小于10 if(minute < 10) { //在分钟的前面加一个0 strMinute = "0" + minute; } else { strMinute = minute + ""; } //如果歌曲的时间中的秒钟小于10 if(second < 10) { //在秒钟前面加一个0 strSecond = "0" + second; } else { strSecond = second + ""; } tv_total.setText(strMinute + ":" + strSecond); //歌曲当前播放时长 minute = currentPostition / 1000 / 60; second = currentPostition / 1000 % 60; //如果歌曲的时间中的分钟小于10 if(minute < 10) { //在分钟的前面加一个0 strMinute = "0" + minute; } else { strMinute = minute + ""; } //如果歌曲的时间中的秒钟小于10 if(second < 10) { //在秒钟前面加一个0 strSecond = "0" + second; } else { strSecond = second + ""; } tv_progress.setText(strMinute + ":" + strSecond); } }; //播放音乐按钮响应函数 public void play(View view) { //播放音乐 mi.play(); } //暂停播放音乐按钮响应函数 public void pausePlay(View view) { //暂停播放音乐 mi.pausePlay(); } //继续播放音乐按钮响应函数 public void continuePlay (View view) { //继续播放音乐 mi.continuePlay(); } //退出音乐播放按钮响应函数 public void exit(View view) { //解绑服务 unbindService(conn); //停止服务 stopService(intent); //结束这个activity finish(); } //实现服务器连接接口 class MyServiceConn implements ServiceConnection { @Override public void onServiceConnected(ComponentName name, IBinder service) { //获得中间人对象 mi = (MusicInterface) service; } @Override public void onServiceDisconnected(ComponentName name) { } } } 第五步:在配置文件中的Application节点下添加服务组件
<service android:name="com.fyt.playmusic.MusicService"> </service>
最后一步:添加读取SD卡的权限
<uses-permission android:name="android.permission.READ_EXTERNAL_STORAGE"/>
以上就是本文的全部内容,希望对大家的学习有所帮助,也希望大家多多支持VEVB武林网。
新闻热点
疑难解答