自定义view--TipView
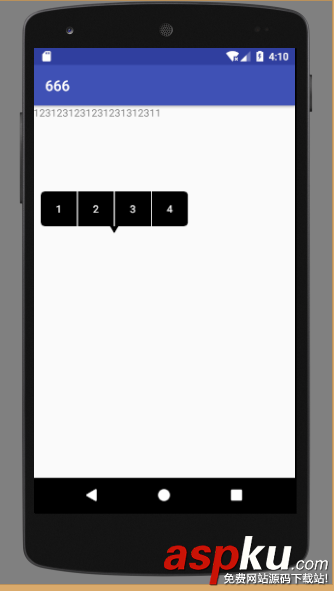
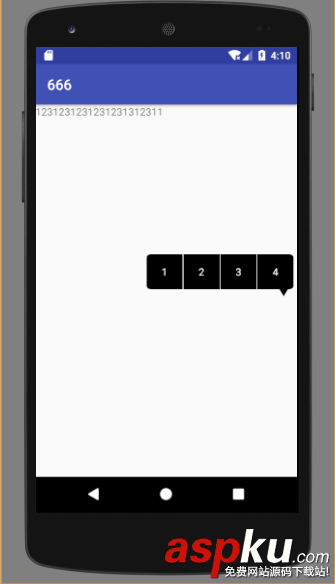
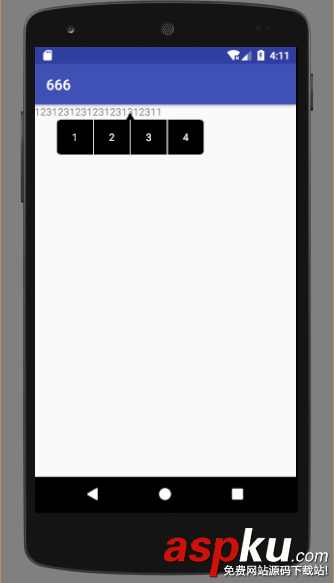
TipView其实就是类似QQ长按消息弹出来的横放的提示框。
通过看书和参考各位大神的博客(再次对大神表示恭敬),我用了一下午时间写完了这么一个view。
先来看图:


1 自定义TipView思路
1 首先我们考虑是继承View还是ViewGroup
其实TipView直观看更像是一个group,里面有子view。但其实我们并不需要继承ViewGroup,因为我们不用像LinearLayout那样在布局文件里面去添加子view,而且TipView的item我们用文字就好。如果继承于Group我们还要考虑onLayout的问题,为了简单我直接继承自View。
2 重写方法
TipView要像PopupWindow、Dialog一样显示在Activity上而不是添加到父容器中,原因是如果创建后添加到父容器中去托管的话,父容器的布局规则会影响我们TipView的显示效果。所以我们要使用WindowManager来把TipView添加到外层布局,并且要充满屏幕,i原因为我们要点击tem之外的地方使TipView消失。所以view大小是固定充满屏幕的,不需要重写onMeasure。
需要重写onDraw来绘制view。
3 显示位置
TipView主要分两部分,一部分是三角标,一部分是带有圆角的主体。
当我们点击后,三角标顶点始终在点击位置上方一定距离(如果顶点定位在点击位置,会导致手指挡住一部分三角,用户体验度不佳),并且主体不要与屏幕左右边界碰撞,当要遮挡ToolBar时向下绘制。
2 定义变量
public static final int TOP = 0;//从点击位置上面绘制 public static final int DOWN = 1;//...下面... private int mItemWidth;//item宽 private int mItemHeight;//item高 private int mTriaHeight;//三角的高度 private int mHalfTriaWidth;//三角的半宽 private int mTriaAcme;//三角的顶点 private int mTriaItemBorder;//三角的顶点 private int realLeft;//窗口距左边的值 private int marginSide;//窗口距左右边的值,防止出现的窗口紧贴边界 private int mSeparateLineColor = Color.WHITE; private int mTextSize;//选项文字的大小 private int mTextColor;//选项文字的颜色 private int mItemSeparation;//分割线宽度; private int mRadius;//圆角 private List<TextItem> items;//存放item的集合 private List<Rect> mItemRectList = new ArrayList<>(); // 存储每个方块 private Paint mPaint;//画笔 private Paint mSeparationPaint;//分割线画笔 private Paint mSPaint;//三角的画笔 private Path mPath;//路径 private int x, y;//点击的位置 private ViewGroup viewRoot;//父容器 private int location = TOP;//绘制位置 private int choose = -1;//点击的item private int mToolbarBottom;//Toolbar下边距屏幕上距离 private WindowManager windowManager; private WindowManager.LayoutParams layoutParams;//windowManger布局管理器,为了像Dialog一样在Activity弹出,而不是依附于某个group private onItemCilckLinener itemCilckLinener; private Context context = null;
3 构造函数以及初始化方法
private MyTipView(Context context, int x, int y, ViewGroup viewRoot, List<TextItem> items) { super(context); this.viewRoot = viewRoot; this.context = context; this.x = x; this.y = y; this.items = items; windowManager = (WindowManager) context.getSystemService(Context.WINDOW_SERVICE); layoutParams = new WindowManager.LayoutParams(); layoutParams.width = WindowManager.LayoutParams.MATCH_PARENT;//窗口的宽 layoutParams.height = WindowManager.LayoutParams.MATCH_PARENT;//窗口的高 //设置LayoutParams的属性 layoutParams.type = WindowManager.LayoutParams.TYPE_APPLICATION_PANEL;//该Type描述的是形成的窗口的层级关系,下面会详细列出它的属性 layoutParams.format = PixelFormat.TRANSLUCENT;//不设置这个弹出框的透明遮罩显示为黑色 //layoutParams.token = viewRoot.getWindowToken();//设置Token int[] location = new int[2]; viewRoot.getLocationInWindow(location);//获取在当前窗口内的绝对坐标 viewRoot.getLocationOnScreen(location);//获取在整个屏幕内的绝对坐标 mToolbarBottom = location[1];//[0]是x轴坐标,[1]y轴 windowManager.addView(this, layoutParams); init(); initView(); } //初始化画笔 private void init() { mPaint = new Paint(); mSPaint = new Paint(); mPath = new Path(); mSeparationPaint = new Paint(); mSeparationPaint.setStyle(Paint.Style.FILL); mPaint.setAntiAlias(true); mPaint.setStyle(Paint.Style.FILL); mPaint.setTextSize(Sp2Px(14)); mPaint.setColor(Color.BLACK); mSPaint.setAntiAlias(true); mSPaint.setStyle(Paint.Style.FILL); mSPaint.setColor(Color.BLACK); //初始变量 mItemWidth = Dp2Px(50); mItemHeight = Dp2Px(48); mTriaHeight = Dp2Px(10);//三角的高度 mHalfTriaWidth = Dp2Px(6);//三角的半宽 mTriaAcme = Dp2Px(6);//三角的顶点 marginSide = Dp2Px(4);//左右边距 mItemSeparation = Dp2Px(1);//分割线宽度; mRadius = Dp2Px(6);//圆角 mTextColor = Color.WHITE; mTextSize = Sp2Px(14); }4 计算三角顶点位置
private void initView() { int count = items.size(); int width = count * mItemWidth + mItemSeparation * (count - 1); int mScreenWidth = getResources().getDisplayMetrics().widthPixels; if (y - mToolbarBottom < (mItemHeight + mTriaHeight + mTriaAcme)) { location = DOWN;//下方显示 mTriaAcme += y;//设置三角顶点y轴值; mTriaItemBorder = mTriaAcme + mTriaHeight;//计算三角方块交界y } else { location = TOP; mTriaAcme = y - mTriaAcme;//计算顶点位置y轴值 mTriaItemBorder = mTriaAcme - mTriaHeight;//计算三角方块交界y值 } if (x < (width / 2 + marginSide)) { realLeft = marginSide;//计算最左侧距离屏幕左边距离,左边撑不下 } else if ((mScreenWidth - x) < (width / 2 + marginSide)) { realLeft = mScreenWidth - marginSide - width;//计算最左侧距离屏幕左边距离,右边撑不下 } else { realLeft = x - width / 2;//计算最左侧距离屏幕左边距离,触碰不到边界 } }5 设置背景为透明
private void drawBackground(Canvas canvas) { canvas.drawColor(Color.TRANSPARENT); }6 绘制三角
private void drawTop(Canvas canvas) { //绘制三角 mPath.reset(); mPath.moveTo(x, mTriaAcme); mPath.lineTo(x - mHalfTriaWidth, mTriaAcme - mTriaHeight); mPath.lineTo(x + mHalfTriaWidth, mTriaAcme - mTriaHeight); canvas.drawPath(mPath, mSPaint); MyDraw(canvas, mTriaItemBorder - mItemHeight); } private void drawDown(Canvas canvas) { //绘制三角 mPath.reset();//清理路径 mPath.moveTo(x, mTriaAcme); mPath.lineTo(x - mHalfTriaWidth, mTriaAcme + mTriaHeight); mPath.lineTo(x + mHalfTriaWidth, mTriaAcme + mTriaHeight); canvas.drawPath(mPath, mSPaint); //绘制方块 MyDraw(canvas, mTriaItemBorder); }7 绘制方块
绘制时因为第一个和最后一个方块带有圆角,单独绘制
private void MyDraw(Canvas canvas, int t) { //绘制item int count = items.size(); int width = (count - 1) * mItemSeparation + count * mItemWidth; int l = realLeft + mItemWidth + mItemSeparation; mItemRectList.clear(); for (int i = 0; i < items.size(); i++) { if (choose == i) {//当前是否被点击,改变颜色 mPaint.setColor(Color.DKGRAY); } else { mPaint.setColor(Color.BLACK); } if (i == 0) {//绘制第一个带圆角的item mPath.reset(); mPath.moveTo(realLeft + mItemWidth, t); mPath.lineTo(realLeft + mRadius, t); mPath.quadTo(realLeft, t, realLeft, t + mRadius); mPath.lineTo(realLeft, t + mItemHeight - mRadius); mPath.quadTo(realLeft, t + mItemHeight, realLeft + mRadius, mItemHeight + t); mPath.lineTo(realLeft + mItemWidth, t + mItemHeight); canvas.drawPath(mPath, mPaint); mSeparationPaint.setColor(mSeparateLineColor); canvas.drawLine(realLeft + mItemWidth, t, realLeft + mItemWidth, t + mItemHeight, mSeparationPaint); } else if (i == (items.size() - 1)) {//绘制最后一个 mPath.reset(); mPath.rMoveTo(realLeft + width - mItemWidth, t); mPath.lineTo(realLeft + width - mRadius, t); mPath.quadTo(realLeft + width, t, realLeft + width, t + mRadius); mPath.lineTo(realLeft + width, t + mItemHeight - mRadius); mPath.quadTo(realLeft + width, t + mItemHeight, realLeft + width - mRadius, t + mItemHeight); mPath.lineTo(realLeft + width - mItemWidth, t + mItemHeight); canvas.drawPath(mPath, mPaint); } else {//绘制中间方块和分割线 mPath.reset(); mPath.moveTo(l, t); mPath.lineTo(l + mItemWidth, t); mPath.lineTo(l + mItemWidth, t + mItemHeight); mPath.lineTo(l, t + mItemHeight); canvas.drawPath(mPath, mPaint); canvas.drawLine(l + mItemWidth, t, l + mItemWidth, t + mItemHeight, mSeparationPaint); l += mItemWidth + mItemSeparation; } mItemRectList.add(new Rect(realLeft + i * (mItemSeparation + mItemWidth), t, realLeft + i * (mItemSeparation + mItemWidth) + mItemWidth, t + mItemHeight)); } }最后一行代码
用一个List来存放Rect(矩形),这些矩形对应的是每一个item的方块,但是并没有绘制出来,只是存放起来,矩形是为了在绘制文字的时候提供文字居中时用到的。
8 绘制文字
private void drawTitle(Canvas canvas) { for (int i = 0; i < items.size(); i++) { Rect rect = mItemRectList.get(i);//用于文字居中 //mPaint.setColor(Color.WHITE); Paint p = new Paint(Paint.ANTI_ALIAS_FLAG); p.setAntiAlias(true); p.setStrokeWidth(3); int s = Dp2Px(items.get(i).getTextSize()); p.setTextSize(mTextSize); if (s != 0)//如果在TextItem中设置了size,就是用设置的size p.setTextSize(s); p.setColor(mTextColor); Paint.FontMetricsInt fontMetricsInt = p.getFontMetricsInt(); p.setTextAlign(Paint.Align.CENTER); int baseline = (rect.bottom + rect.top - fontMetricsInt.bottom - fontMetricsInt.top) / 2;//文字居中,基线算法 canvas.drawText(items.get(i).getTitle(), rect.centerX(), baseline, p); } }9 点击变色,以及点击事件实现
@Override public boolean onTouchEvent(MotionEvent event) { switch (event.getAction()) { case MotionEvent.ACTION_DOWN: for (int i = 0; i < items.size(); i++) { if (itemCilckLinener != null && isPointInRect(new PointF(event.getX(), event.getY()), mItemRectList.get(i))) { choose = i;//记录点击item编号 Rect rect = mItemRectList.get(i); postInvalidate(rect.left, rect.top, rect.right, rect.bottom);//刷新视图 return true; } } removeView();//点击item以外移除 return false; case MotionEvent.ACTION_UP: for (int i = 0; i < items.size(); i++) { if (itemCilckLinener != null && isPointInRect(new PointF(event.getX(), event.getY()), mItemRectList.get(i))) { if (i == choose) {//与down的item一样时才触发 itemCilckLinener.onItemCilck(items.get(i).getTitle(), i);//触发点击事件 removeView(); return true; } } else {//点下后移动出item,初始化视图 postInvalidate();//刷新视图 } } choose = -1;//重置 return false; } return false; } /** * 判断这个点有没有在矩形内 * * @param pointF * @param targetRect * @return */ private boolean isPointInRect(PointF pointF, Rect targetRect) { if (pointF.x < targetRect.left) { return false; } if (pointF.x > targetRect.right) { return false; } if (pointF.y < targetRect.top) { return false; } if (pointF.y > targetRect.bottom) { return false; } return true; }10 Builder模式创建
public static class Builder { private List<TextItem> items = new ArrayList<>(); private int x = 0, y = 0; private Context context; private ViewGroup viewRoot; private onItemCilckLinener itemCilckLinener; private int mRadius; public Builder(Context context, ViewGroup viewRoot) { this.context = context; this.viewRoot = viewRoot; } public Builder addItem(TextItem item) { items.add(item); return this; } public Builder setmRadius(int radius) { mRadius = radius; return this; } public Builder setxAndy(int x, int y) { this.x = x; this.y = y; return this; } public Builder setOnItemClickLinener(onItemCilckLinener itemClickLinener) { this.itemCilckLinener = itemClickLinener; return this; } public MyTipView create() { if (items.size() == 0) { try { throw new Exception("item count is 0"); } catch (Exception e) { e.printStackTrace(); } } MyTipView myTipView = new MyTipView(context, x, y, viewRoot, items); myTipView.setItemCilckLinener(itemCilckLinener); if (mRadius != 0) myTipView.setRadius(mRadius); return myTipView; } }11 item
//TipView的item public static class TextItem { private String title; private int textSize; private int textColor = Color.WHITE; public TextItem(String title) { this.title = title; } public TextItem(String title, int textSize) { this.title = title; this.textSize = textSize; } public TextItem(String title, int textSize, int textColor) { this.title = title; this.textSize = textSize; this.textColor = textColor; } public String getTitle() { return title; } public void setTitle(String title) { this.title = title; } public int getTextSize() { return textSize; } public void setTextSize(int textSize) { this.textSize = textSize; } public int getTextColor() { return textColor; } public void setTextColor(int textColor) { this.textColor = textColor; } }12 使用示例
MyTipView.Builder builder = new MyTipView.Builder(this, linearLayout); builder.addItem(new MyTipView.TextItem("1")) .addItem(new MyTipView.TextItem("2")) .addItem(new MyTipView.TextItem("3")) .addItem(new MyTipView.TextItem("4")) .setxAndy((int) x, (int) y) .setOnItemClickLinener(new MyTipView.onItemCilckLinener() { @Override public void onItemCilck(String title, int i) { Toast.makeText(MainActivity.this, title, Toast.LENGTH_SHORT).show(); } }) .create();13 源码
https://github.com/liujiakuoyx/learn/blob/master/MyTipView.java
以上就是本文的全部内容,希望对大家的学习有所帮助,也希望大家多多支持VEVB武林网。
新闻热点
疑难解答