使用jsp模板来封装网页布局
window 工具包提供了一种典型的布局机制,比如说在一个容器中确定部件元素的位置。在awt 和 swing都有布局管理器,而在visualworks smalltalk中有wrapper。本文将介绍一种jsp模板机制,它允许布局被封装和重新利用。jsp模板最小化了布局改变所造成的影响,这里我们将鼓励大家采用封装模块化设计。
尽管 工具的改进非常迅速,但是它们仍然落后于图形用户界面(gui)工具包(swing 和 visualworks smalltalk)。例如,在传统的gui工具包中提供了布局管理器,在一个窗体或另一个窗体中,允许布局运算被封装和重新利用。本文介绍的这种jsp模板机制,就象布局管理器一样,可以封装布局,所以它能够被重新利用而不只是复制使用。
由于在布局的发展过程中出现了许多的变化,而对功能的封装是非常重要的一步,它能够被自如修改而做到对其他应用的影响最小。
jsp没有提供对封装布局的直接支持,所以具有统一格式的网页通常可以复制布局代码;例如,在图1中,显示了一个网页,它包含了标题、页脚、工具条以及页面的主要内容。 
图1.网页布局 点击放大(22 kb)
在图1中显示的网页布局将以html表格标签来执行:
例1.包含内容:
<html><head><title>jsptemplates</title></head>
<body background='graphics/background.jpg'>
<table>
<tr valign='top'><td><%@include file='sidebar.html'%></td>
<td><table>
<tr><td><%@include file='header.html'%></td></tr>
<tr><td><%@include file='introduction.html'%></td></tr>
<tr><td><%@include file='footer.html'%></td></tr>
</table>
</td>
</tr>
</table>
</body></html>
在上面的例子中,包括了jsp include 命令,它允许页面内容改变——通过改变包含的文件——无须修改网页自身。不过,由于布局是很难被编码的,布局改变需要对网页进行修改。如果一个网站有多个相同格式的页面,那么一般情况下甚至简单布局的改变也涉及到整个页面的修改。
为了减少布局改变所造成的影响,我们需要一种仅仅只包含布局的机制;采用这种机制,布局和内容都可以在不修改文件的情况下分开进行修改。这种机制就是jsp模板。
使用模板
模板是一种jsp文件,它包含了参数化了的内容。这里所讨论的模板使用的是一套定制化标签来执行的:template:get,template:put和template:insert。template:get 标签访问参数化的内容,就象在例 2.a中的一样,它将和图 1一样的格式来生成网页。
例 2.a.一个模板
<%@taglib uri='/web-inf/tlds/template.tld' prefix='template' %>
<html><head><title><template:get name='title'/></title></head>
<body background='graphics/background.jpg'>
<table>
<tr valign='top'><td><template:get name='sidebar'/></td>
<td><table>
<tr><td><template:get name='header'/></td></tr>
<tr><td><template:get name='content'/></td></tr>
<tr><td><template:get name='footer'/></td></tr>
</table>
</td>
</tr>
</table>
</body></html>
例 2.a几乎与例1完全一样,不过在例2.a中我们使用了template:get 取代了例1中的include 命令.让我们来分析一下template:get 如何运行。
template:get 使用了一个专门的名字(在请求的范围内)来对一个java bean进行修改。bean包含了uri (统一资源标志符,网页的一个组件,它包含在template:get中)。例如,在例 2.a的模板列表中,template:get 获得了一个uri——header.html——从一个名为header 的bean中(在请求的范围内)。接着在template:get 中包含了header.html。
template:put 把bean放到请求的范围内(此范围将在后面被template:get修改)。 模板包含在template:insert中。 例 2.b中举例说明了put 和 insert 标签的用法:
例 2.b. 从例2.a中使用模板
<%@taglib uri='/web-inf/tlds/template.tld' prefix='template' %>
<template:inserttemplate='/articletemplate.jsp'>
<template:put name='title' content='templates' direct='true'/>
<template:put name='header' content='/header.html' />
<template:put name='sidebar' content='/sidebar.jsp' />
<template:put name='content' content='/introduction.html'/>
<template:put name='footer' content='/footer.html' />
</template: insert>
在insert 开头标签指定了被包含的模板,在这个例子里,模板在例2.a中。每一个put 标签在请求范围内存储了一个bean,而在insert 结尾标签包含了模板。模板接着象上面所描述的那样访问bean。
direct 的属性能够为template:put指定;如果direct 设置为true, 和标签相关联的内容将不包含在template: get中。
一个网站包含了多页相同格式的页面,这样就可以使用一个模板,比如在例 2.a中列出了一个模板,在许多的jsp网页(例2.b)中,都用到了这个模板。
使用模板的另一个好处是可以进行模块化设计。例如,例2.b中列出的jsp 文件中包含了header.html,让我们再来看下面的例2.c。
例2.c. header.html
<table>
<tr>
<td><img src='http://www.pushad.com/info/graphics/java.jpg'/></td>
<td><img src='http://www.pushad.com/info/graphics/templates.jpg'/></td>
</tr>
</table><hr>
由于header.html 是被包含的内容,所以它不必在需要显示标头的页面中复制其代码。而且,尽管header.html 是一个html文件,但是在文件中并没有使用一般的起始html标签(比如<html>或<body>),因为这些标签都将被模板定义。由于在模板中包含了header.html,这些标签在header.html就可以不必再使用了。
注意:jsp提供了两种方式来包含内容:静态方式,使用include命令;动态方式,使用include action。include命令包含了目标页面的引用源,这和c语言中的#include和java中的import相似。include action 包含了在运行时间内目标所产生的响应。
与jsp include action一样,模板包含有动态内容。所以,尽管在例1和例2.b中的jsp网页在功能上是一致的,但是前面包含的静态内容被后面动态的包含了。
可选内容
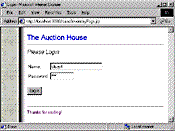
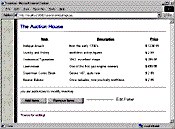
所有的模板内容都是可选的,模板的内容可以很容易的在更多的网页中使用。例如,在图 2.a和图 2.b中显示了两个页面——登录和清单——它们使用的是同一个模板。两个页面中都包含一个标头、页脚和主要内容。清单页面中有一个编辑panel (这是登陆页面所缺乏的)用来改变清单。 
图 2.a.一个登陆窗口 点击放大(24 kb) 
图 2.b.一个清单页 点击放大(42 kb)
下面,你会发现模板将被登录和清单页面共用:
<%@taglib uri='template.tld' prefix='template' %>
……
<table width='670'>
<tr><td width='60'></td>
<td><template:get name='header'/></td></tr>
<tr><td width='60'></td>
<td><template:get name='main-content'/></td></tr>
<tr><td width='60'></td>
<td><template:get name='editpanel'/></td></tr>
<tr><td width='60'></td>
<td><template:get name='footer'/></td></tr>
</table>
……
清单页面使用了上面的模板以及专门用于编辑panel的内容:
<%@taglib uri='template.tld' prefix='template' %>
<%@taglib uri='security.tld' prefix='security' %>
<template:inserttemplate='/template.jsp'>
……
<template:put name='editpanel'
content='/editpanelcontent.jsp'/>
……
</template:insert>
与上面相对照,登录页面没有专门用于编辑panel的内容:
<%@taglib uri='template.tld' prefix='template' %>
<template:inserttemplate='/template.jsp'>
<template:put name='title' content='login' direct='true'/>
<template:put name='header' content='/header.jsp'/>
<template:put name='main-content'
content='/login.jsp'/>
<template:put name='footer' content='/footer.jsp'/>
</template:insert>
由于登录页面中没有专门用于编辑panel的内容,所以它没有包括。
基于role的内容
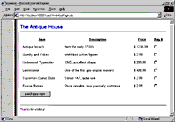
web应用程序常常会基于不同的用户生成不同的内容。 例如,相同的 jsp模板,只有当用户为管理员的时候才出现编辑panel,下面是得出的两个不同的页面(如图3.a和3.b.) 
图 3.a. 管理员的清单页面 点击放大(27 kb) 
图 3.b.其他用户的清单页面 点击放大(21 kb)
在图3.a和3.b中的模板使用了template:get的 role 属性:
<%@taglib uri='template.tld' prefix='template' %>
......
<table>
......
<td><template:get name='editpanel' role='curator'/></td></tr>
......
</table>
......
get 标签仅仅在用户的role 与role属性相匹配的时候才包含内容。让我们来看看标签handler是如何使用role属性的:
public class gettagextendstagsupport {
private string name = null, role = null;
......
public void setrole(string role) { this.role = role; }
......
public int dostarttag() throws jspexception {
......
if(param != null) {
if(roleisvalid()) {
// include or print content ......
}
}
......
}
private boolean roleisvalid() {
return role == null || // valid if role isn't set
((javax.servlet.http.httpservletrequest)
pagecontext.getrequest()).isuserinrole(role);
}
}
新闻热点
疑难解答