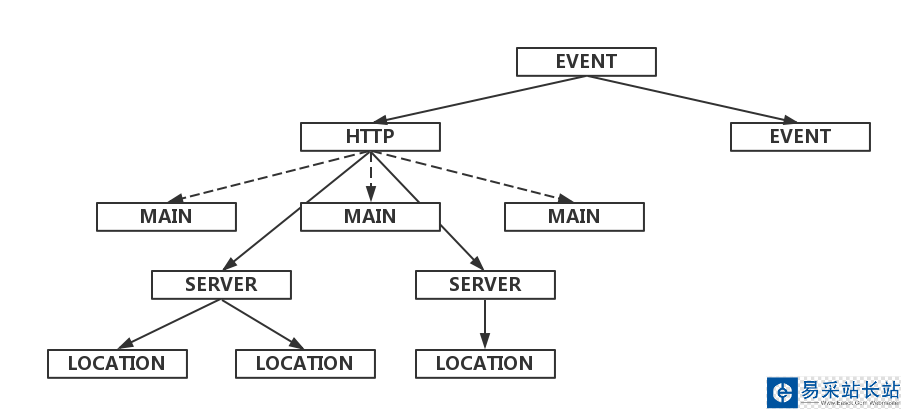
要理解 HTTP 模块配置解析的过程,首先需要对 nginx 的配置文件结构做一个了解
nginx 的配置文件是用树状结构组织的,每个 NGX_CORE_MODULE 作为根统领着其下的所有配置项
而如下图所示,HTTP 模块的配置被分成了 main、server、location 三层

整个 nginx 配置解析的过程其实就是这棵树的深度遍历过程
而遍历 HTTP 子树的函数就是下面要介绍的 ngx_http_block
配置文件解析 -- http 配置块
当我们需要使用 http 模块的时候,我们需要在配置文件中加入 http 配置块:
http { // http 配置块 {{{ include mime.types; default_type application/octet-stream; #log_format main '$remote_addr - $remote_user [$time_local] "$request" ' # '$status $body_bytes_sent "$http_referer" ' # '"$http_user_agent" "$http_x_forwarded_for"'; #access_log logs/access.log main; sendfile on; #tcp_nopush on; #keepalive_timeout 0; keepalive_timeout 65; #gzip on; server { listen 8001; server_name localhost; #autoindex on; #charset koi8-r; #access_log logs/host.access.log main; location / { root /var/www/; index index.html index.htm index.php;在 http 配置块中,我们配置了 http 连接相关的信息,HTTP 框架也正是从这里启动的.
在 nginx 初始化的过程中,执行了 ngx_init_cycle 函数,其中进行了配置文件解析,调用了 ngx_conf_parse 函数
配置文件解析
函数 ngx_conf_handler 根据配置项的 command 调用了对应的 set 回调函数
// static ngx_int_t ngx_conf_handler(ngx_conf_t *cf, ngx_int_t last)// 配置项解析 {{{static ngx_int_tngx_conf_handler(ngx_conf_t *cf, ngx_int_t last){ char *rv; void *conf, **confp; ngx_uint_t i, found; ngx_str_t *name; ngx_command_t *cmd; name = cf->args->elts; found = 0; for (i = 0; ngx_modules[i]; i++) { cmd = ngx_modules[i]->commands; if (cmd == NULL) { continue; } for ( /* void */ ; cmd->name.len; cmd++) { if (name->len != cmd->name.len) { continue; } if (ngx_strcmp(name->data, cmd->name.data) != 0) { continue; }阅读各模块的 ngx_command_t 命令配置结构,可以找到:
// static ngx_command_t ngx_http_commands// http 模块命令结构 {{{static ngx_command_t ngx_http_commands[] = { { ngx_string("http"), NGX_MAIN_CONF|NGX_CONF_BLOCK|NGX_CONF_NOARGS, ngx_http_block, 0, 0, NULL }, ngx_null_command}; // }}}http 配置块解析 -- ngx_http_block

在解析到 http 配置块时,执行了对应的 set 回调函数 ngx_http_block
新闻热点
疑难解答