从官网下载ckeditor,我下载的是ckeditor_3.0.2。CKEditor与原来的FCKeditor有太大的不同了,作为开发人员,在做自己的博客的时候总是需要贴代码的,只好给它先做一个插入代码的插件了。高亮代码用的是"SyntaxHighlighter"。
1、在"ckeditor/plugins/"目录下新建一个"insertcode"目录,然后在"insertcode"目录下新建一个"plugin.js",输入以下代码:
复制代码代码如下:
CKEDITOR.plugins.add('insertcode', {
requires: ['dialog'],
init: function(a){
var b = a.addCommand('insertcode', new CKEDITOR.dialogCommand('insertcode'));
a.ui.addButton('insertcode', {
label: a.lang.insertcode.toolbar,
command: 'insertcode',
icon: this.path + 'images/code.jpg'
});
CKEDITOR.dialog.add('insertcode', this.path + 'dialogs/insertcode.js');
}
});
2、增加"images"目录,放入一个"code.jpg"的图片,当然图片可以从google找一个,16*16大小的就好了。
3、增加"dialogs"目录,新建一个"insertcode.js",输入如下代码:
insertcode.js
复制代码代码如下:
CKEDITOR.dialog.add('insertcode', function(editor){
var escape = function(value){
return value;
};
return {
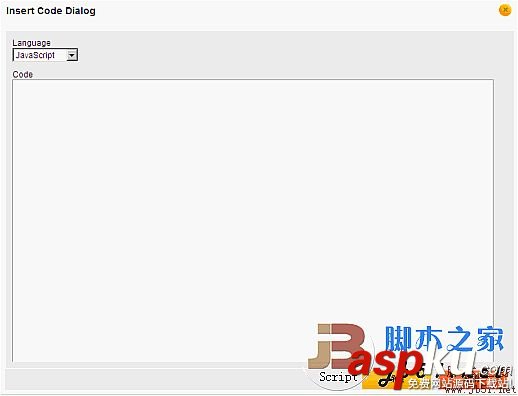
title: 'Insert Code Dialog',
resizable: CKEDITOR.DIALOG_RESIZE_BOTH,
minWidth: 720,
minHeight: 480,
contents: [{
id: 'cb',
name: 'cb',
label: 'cb',
title: 'cb',
elements: [{
type: 'select',
label: 'Language',
id: 'lang',
required: true,
'default': 'csharp',
items: [['ActionScript3', 'as3'], ['Bash/shell', 'bash'], ['C#', 'csharp'], ['C++', 'cpp'], ['CSS', 'css'], ['Delphi', 'delphi'], ['Diff', 'diff'], ['Groovy', 'groovy'], ['Html', 'xhtml'], ['JavaScript', 'js'], ['Java', 'java'], ['JavaFX', 'jfx'], ['Perl', 'perl'], ['PHP', 'php'], ['Plain Text', 'plain'], ['PowerShell', 'ps'], ['Python', 'py'], ['Ruby', 'rails'], ['Scala', 'scala'], ['SQL', 'sql'], ['Visual Basic', 'vb'], ['XML', 'xml']]
}, {
type: 'textarea',
style: 'width:700px;height:420px',
label: 'Code',
id: 'code',
rows: 31,
'default': ''
}]
}],
onOk: function(){
code = this.getValueOf('cb', 'code');
lang = this.getValueOf('cb', 'lang');
html = '' + escape(code) + '';
editor.insertHtml("<pre class=/"brush:" + lang + ";/">" + html + "</pre>");
},
onLoad: function(){
}
};
});
我是用"syntaxhighlighter"来做代码高亮的,如果你不喜欢它也可以换成其它的。
4、接下来就是把插件加入到CKEditor里了,我是直接修改CKEditor插件的核心文件的,因为我是把“插入代码”功能做为一个编辑器必要的功能来使用的。
找到ckeditor目录下的"ckeditor.js",这里的代码是经过压缩的,我们用CKEditor原来的about插件做参考。查找"about",找到"fullPage:false,height:200,plugins:'about,basicstyles",我们在"about"后面增加",insertcode",这里就变成"plugins:'about,insertcode,basicstyles"。
继续查找"about",找到"j.add('about',{init:function(l){var m=l.addCommand('about',new a.dialogCommand('about'));m.modes={wysiwyg:1,source:1};m.canUndo=false;l.ui.addButton('About',{label:l.lang.about.title,command:'about'});a.dialog.add('about',this.path+'dialogs/about.js');}});",我们在这个分号后面增加"j.add('insertcode', {requires: ['dialog'],init: function(l){l.addCommand('insertcode', new a.dialogCommand('insertcode'));l.ui.addButton('insertcode', {label: l.lang.insertcode.toolbar,command: 'insertcode',icon: this.path + 'images/code.jpg'});a.dialog.add('insertcode', this.path + 'dialogs/insertcode.js');}});"。
接下来查找"i.toolbar_Basic=",这就是CKEditor默认的工具栏了,我们在这里加上",insertcode",你可以加在你想要的位置。比如我的"['Maximize','ShowBlocks','-','insertcode']"。
5、进入"ckeditor/lang",分别在"en.js","zh.js","zh-cn.js"中增加",insertcode:'Insert Code'",",insertcode:'插入代碼'",",insertcode:'插入代码'"。
6、对CKEditor的修改已经OK了,还有最后一步就是在你需要高亮代码的页面引用:
syntaxhighlighter
复制代码代码如下:
<link type="text/css" rel="stylesheet" href="http://blog.moozi.net/wp-includes/js/syntaxhighlighter/styles/shCore.css"/>
<link type="text/css" rel="stylesheet" href="http://blog.moozi.net/wp-includes/js/syntaxhighlighter/styles/shThemeDefault.css"/>
<script type="text/javascript" src="http://blog.moozi.net/wp-includes/js/syntaxhighlighter/shCore.js"></script>
<script type="text/javascript" src="http://blog.moozi.net/wp-includes/js/syntaxhighlighter/shBrushes.js"></script>
这四个文件在syntaxhighlighter的下载包里都有,最后,还在页面增加这段JS:
复制代码代码如下:
<script type="text/javascript">
SyntaxHighlighter.config.clipboardSwf = 'http://img.vevb.com/js/syntaxhighlighter/clipboard.swf';
SyntaxHighlighter.all();
</script>
解压后"syntaxhighlighter_2.1.364/scripts"目录下有"shBrushes.js"是我把syntaxhighlighter所有的高亮代码都添加到一个js文件中,减少http请求。
CKEditor的"插入代码"插件就OK了。
评价功能即可插入代码进行高亮显示。同时也修改了表情插件,现在使用的是QQ的表情包。有需要这个修改方法的朋友请留言,我会把QQ表情的插件制作方法贴出来。
