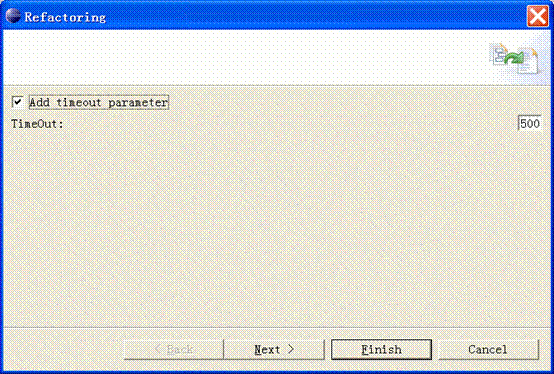
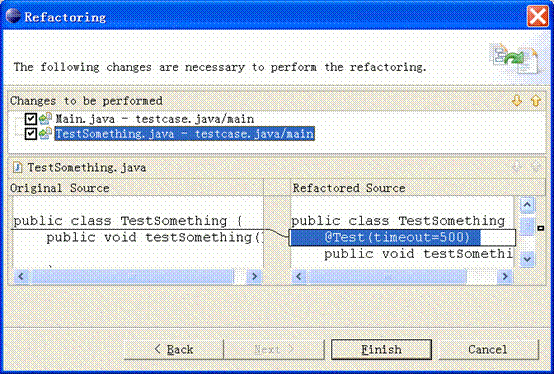
对重构的强大支持是软件开发人员喜爱eclipse的一个最为重要的原因。而eclipse还有一个至少和重构不相上下的优点,那就是其近乎无懈可击的可扩展性。这两者的结合意味着我们可以根据自己的需要来创建展新的重构功能。


package main;
public class testsomething {
@test(timeout=500)
public void testsomething(){}
}
org.eclipse.jface.text
org.eclipse.ltk.core.refactoring
org.eclipse.ltk.ui.refactoring
org.eclipse.jdt
org.eclipse.jdt.core
manifest-version: 1.0
bundle-manifestversion: 2
bundle-name: annotation plug-in
bundle-symbolicname: manage.annotation; singleton:=true
bundle-version: 1.0.0
bundle-activator: manage.annotation.annotationplugin
bundle-localization: plugin
require-bundle: org.eclipse.ui,
org.eclipse.core.runtime,
org.eclipse.jface.text,
org.eclipse.ltk.core.refactoring,
org.eclipse.ltk.ui.refactoring,
org.eclipse.jdt,
org.eclipse.jdt.core
eclipse-autostart: true
<?xml version="1.0" encoding="utf-8"?>
<?eclipse version="3.0"?>
<plugin>
<extension
point="org.eclipse.ui.actionsets">
<actionset
label="annotation action set"
visible="true"
id="manage.annotation.actionset">
<menu
label="%refactoring.menu.label"
path="source"
id="org.eclipse.jdt.ui.refactoring.menu">
<separator name="reorggroup"/>
</menu>
<action
class="manage.annotation.actions.annotationmanageaction"
icon="icons/sample.gif"
id="manage.annotation.actions.annotationmanageaction"
label="%annotation.manage"
menubarpath="org.eclipse.jdt.ui.refactoring.menu/reorggroup"
toolbarpath="reorggroup"
tooltip="manage annotation in java project"/>
</actionset>
</extension>
</plugin>
public void selectionchanged(iaction action, iselection selection) {
if (selection.isempty())
select = null;
else if (selection instanceof istructuredselection) {
istructuredselection strut = ((istructuredselection) selection);
if (strut.size() != 1)
select = null;
if (strut.getfirstelement() instanceof ijavaelement)
select = (ijavaelement) strut.getfirstelement();
} else
select = null;
action.setenabled(select != null);
}

操作的执行是在annotationmanageaction的run函数中实现的,例如在本文的工程中,就是弹出refactoringwizard对话框,指导用户完成重构的工作,这些我们将在下面的章节中讲述。
扩展refactoring类
通过前面系统构架的介绍,大家知道了refactoring和refactoringwizard是完成eclipse重构功能的基础类。在创建好插件工程后,我们就通过扩展refactoring来实现具体的功能。
refactoring是所有支持代码转化的类的抽象父类,它在整个流程中与refactoringwizard交互以完成重构的功能,起着非常重要的作用。这些类需要提供以下两类方法:
用于条件检查的方法,判断重构操作大体而言能否执行,以及具体的转化能否完成;
创建change对象的方法,change对象描述了所有将要执行的对当前代码的修改操作。
refactoring类的典型流程如下所示:
1. 具体的refactoring类被创建。
2. 获得用户选择的要进行重构的对象,初始化该refactoring类。这个由具体的实现类给出相应的方法。
3. 在重构操作开始执行时,首先调用refactoring的checkinitialconditions(iprogressmonitor) 基于用户选择的对象做一个的初始检查,这个通常由界面自动执行。返回refactoringstatus.fatal表明初始检查没有通过,重构操作不能继续。
4. 获得进行重构的其他参数,比如,对重命名操作来说就是指新名字。这个通常是由界面根据用户的输入提供的。由具体的实现类给出相应的方法。
5. 获得用户输入参数后,调用refactoring的checkfinalconditions(iprogressmonitor)进行剩下的检查,这个通常由界面自动执行,返回refactoringstatus.fatal表明最后的检查没有通过,重构操作不能继续。
6. 调用refactoring的createchange(iprogressmonitor)获得change对象,这个通常由界面自动执行,界面可以根据change对象显示预览界面。
基于以上的介绍,为了实现本文工程中的重构操作,我们需要扩展refactoring类,为它增加一个构造函数,并且具体实现checkinitialconditions、checkfinalconditions和createchange三个函数。
首先通过菜单file -> new->class弹出创建类的对话框,输入包名manage.annotation.refactor,类名annotationrefactoring,输入父类org.eclipse.ltk.core.refactoring.refactoring,选中"继承抽象方法"复选框,点击完成按钮,一个扩展了refactoring的最基本的类annotationrefactoring就被创建出来了。
首先为其增加构造函数,以用户选择的java模型元素作为参数。refactoring分析这个参数以得到所有相关的可写java文件,作为重构操作的对象,如果该模型元素包含在java文件中,则找到包含它的文件节点;如果该模型元素包含java文件,则找到它的所有子java文件。构造函数代码如下:
清单 6
public annotationrefactoring(ijavaelement element) {
while (element.getelementtype() > ijavaelement.compilation_unit) {
element = element.getparent();
if (element == null)
return;
}
if (element.getelementtype() == ijavaelement.compilation_unit) {
if (!element.isreadonly())
compilationunits.add(element);
}
if (element.getelementtype() < ijavaelement.compilation_unit)
findwritablecompilationunits(element);
}
public refactoringstatus checkinitialconditions(iprogressmonitor pm)
throws coreexception, operationcanceledexception {
return refactoringstatus.createinfostatus("initial condition is ok!");
}
public refactoringstatus checkfinalconditions(iprogressmonitor pm)
throws coreexception, operationcanceledexception {
collectchanges();
if (fchangemanager.size() == 0)
return refactoringstatus.createfatalerrorstatus("no testing methods found!");
else return refactoringstatus.createinfostatus("final condition is ok!");
}
使用ast构造change对象
当我们找到了修改的位置时,我们有两个选择:
1. 通过iscanner接口扫描代码,然后通过ibuffer接口直接修改代码
2. 通过遍历和编辑ast树进行结构化的修改
developerworks提供的文章《扩展eclipse的java开发工具》中,给出了使用ibuffer接口的例子。现在我们要讲述使用ast来遍历和修改java源代码的方法。
ast是abstract syntax tree的缩写。它是eclipse中的java开发环境(jdt)为我们提供的极为强大的源代码解析和编辑工具。
在使用ast树提供的功能之前,我们首先要创建ast树。由于ast树的构建是一项费时的操作,jdt缺省情况下不将源代码解析为ast树。下面的代码演示了获得一个icompilationunit对应的ast树的过程。在jdt提供的api中,icompilationunit接口用于表示一个可以被编译的源代码文件。在我们提供的例子程序中,我们通过下面的代码将整个文件解析成为了一颗ast树。
清单 9
astparser parser = astparser.newparser(ast.jls3);
parser.setsource(cu);
astnode root = parser.createast(null);
private void getmethods(astnode cuu, final list methods) {
cuu.accept(new astvisitor() {
public boolean visit(methoddeclaration node) {
methods.add(node);
return false;
}
});
}
private boolean collectchanges(compilationunit root,methoddeclaration method) {
if (method.getname().getfullyqualifiedname().startswith("test")) {
ast ast = method.getast();
if (needtimeout) {
normalannotation na = ast.newnormalannotation();
na.settypename(ast.newsimplename("test"));
membervaluepair pair = ast.newmembervaluepair();
pair.setname(ast.newsimplename("timeout"));
pair.setvalue(ast.newnumberliteral("500"));
na.values().add(pair);
method.modifiers().add(0, na);
} else {
markerannotation na = ast.newmarkerannotation();
na.settypename(ast.newsimplename("test"));
method.modifiers().add(0, na);
}
return true;
}
return false;
}
root.recordmodifications();
//在这里修改ast树…
textedit edits = root.rewrite(document, cu.getjavaproject()
.getoptions(true));
textfilechange change = new textfilechange("", (ifile) cu
.getresource());
change.setedit(edits);
public change createchange(iprogressmonitor pm) throws coreexception,operationcanceledexception {
change[] changes = new change[fchangemanager.size()];
system.arraycopy(fchangemanager.toarray(), 0, changes, 0,fchangemanager.size());
compositechange change = new compositechange("add @override annotation", changes);
return change;
}
扩展refactoringwizard 框架
eclipse中的refactoringwizard框架扩展了eclipse的wizard框架,关于wizard框架的介绍可以在eclipse的帮助系统中找到,这里我们仅从oo设计和架构的角度探讨一下refactoringwizard框架。
我们从wizard相关的几个类开始:
1. wizardpage类
wizardpage是一个包含了多个界面元素(比如文本框text,按钮button)的一个界面组合部分。各个page之间是独立的,是可以动态加载的。wizardpage类的职责有:
·组合swt界面元素,构造出一个界面页。
·定义本身界面元素的操作行为。
在refactoringwizard框架中预设了两个通用的属性页:previewwizardpage和errorwizardpage。previewwizardpage类是用来预览重构后的修改,对比代码或其他资源的变化。errorwizardpage类是用来处理条件检查及错误状态通知的。我们只需扩展refactoringwizard框架就可以自动获取这两项强大的功能。
2. wizard类
一个wizard就是一个装载一系列wizardpage页的容器,wizard类的职责有:
·装载一系列wizardpage,构造出一个复杂的界面。
·装载领域类来处理具体业务逻辑。(在refactoringwizard框架中这个类就是refactoring类)
维护wizardpage页之间以及页与领域类之间的数据传递和状态共享。(在这里要补充一点,其实在具体refactoringwizard框架的实现中有专门的类来分担这部分职责。)
我们的界面行为可以千变万化(通过组合不同的wizardpage),而负责处理业务逻辑的领域类也可以独立的变化,你可以随意扩展wizard的界面功能(-对扩展开放),而不用修改现有refactoringwizard框架(-对修改封闭),这正是oo设计的最基本原则-ocp(open-close principle)。
3. wizarddialog类
这个对话框类的主要职责是构造一个完整的gui界面以及操作界面。它预设了一些按钮(back,next,finish,cancel)等界面元素,它负责装载wizard类,操作时通过按钮back、next来在多个wizardpage之间切换。
下面我们给出refactoringwizard框架的架构图:

/**
* create composite to add ui elements
*/
public void createcontrol(composite parent) {
// define ui
composite composite = new composite(parent, swt.none);
gridlayout lay = new gridlayout();
lay.numcolumns = 2;
composite.setlayout(lay);
btncheck = new button(composite, swt.check);
btncheck.settext("add timeout parameter");
griddata gdbtncheck = new griddata();
gdbtncheck.horizontalspan = 2;
gdbtncheck.horizontalalignment = griddata.fill;
btncheck.setlayoutdata(gdbtncheck);
labname = new label(composite, swt.wrap);
labname.settext("timeout:");
griddata gdlabname = new griddata();
gdlabname.horizontalalignment = griddata.beginning;
gdlabname.grabexcesshorizontalspace = true;
labname.setlayoutdata(gdlabname);
txttimeout = new text(composite, swt.single | swt.border);
griddata gdtxttimeout = new griddata();
gdtxttimeout.horizontalalignment = griddata.end;
gdlabname.grabexcesshorizontalspace = true;
txttimeout.setlayoutdata(gdtxttimeout);
txttimeout.settext("500");
// init status
labname.setenabled(false);
txttimeout.setenabled(false);
// add listener
definelistener();
// 将composite纳入框架的控制
setcontrol(composite);
dialog.applydialogfont(composite);
}
private void notifystatus(boolean valid, string message) {
//设置错误信息
seterrormessage(message);
//设置页面完成状态
setpagecomplete(valid);
}
private void setrefactoring(boolean selection, string text) {
annotationrefactoring refactoring = (annotationrefactoring) getrefactoring();
refactoring.setneedtimeout(true);
if(selection) {
refactoring.settimeout(integer.valueof(txttimeout.gettext()).intvalue());
}
}
public annotationrefactoringwizard(refactoring refactoring) {
super(refactoring, wizard_based_user_interface);
}
protected void adduserinputpages() {
page = new annotationrefactoringwizardpage("refactor annotation");
addpage(page);
}
public void run(iaction action) {
shell shell = window.getshell();
annotationrefactoring refactor = new annotationrefactoring(select);
annotationrefactoringwizard wizard = new annotationrefactoringwizard(refactor);
refactoringwizardopenoperation op = new refactoringwizardopenoperation(wizard);
try {
op.run(shell, "inserting @override annotation");
} catch (interruptedexception e) {
e.printstacktrace();
}
}
新闻热点
疑难解答