今天本想写一片 GAE+goAgent+SwitchySharp 的指南的!但是突然翻出了前段时间写的关于iOS中的SQL数据库文件加密的代码,于是乎决定今天就先讲讲这个!~ 那么goAgent将放在周末,后续的文章中除了文件加密,还有传输数据加密,感兴趣的童鞋 敬请留意。
言归正传,sql的文件加密,我们首先要用到一个库,它就是大名鼎鼎的Sqlcipher, 奉上连接:http://sqlcipher.NET,在ios里 我们需要看的文档是这一篇http://sqlcipher.Net/ios-tutorial/,文档是全英文的,在此,不详细阐述,只按步骤教大家怎么做,至于为什么做的问题,就需要自己去寻找答案了!
1.下载需要的库 这里我们总共需要3个目录的文件,分别是sqlcipher,openssl-xcode,openssl-1.0.0e。
首先下载第一个
% cd ~/Documents/code//命令行cd到你要下载的目录 % curl -o openssl-1.0.0e.tar.gz http://www.openssl.org/source/openssl-1.0.0e.tar.gz//下载 % tar xzf openssl-1.0.0e.tar.gz //解压缩
附:
SQLCipher uses the widely trusted and peer-reviewed OpenSSL library for all cryptographic functions including the AES-256 algorithm, pseudo random number generation, and PBKDF2 key derivation. OpenSSL isn't framework that is usable directly on the iPhone so we will setup our project to build and link against it as a static library.
Download the 1.0.x stable version from http://www.openssl.org/source/ and extract it to a folder on your system. Since the same OpenSSL source tree may be shared across multiple SQLCipher projects, it's a good idea to place this in some shared location outside of your project folder. Justs make a note of the source directory path for later.
(看不懂英文的童鞋也不用着急,跟着继续做就好了,也很好理解)
OpenSSL是套开源的SSL套件,其函数库是以C�言所写,实现基本的����料加密功能。
第二个
% cd ~/Documents/code/SQLCipherApp % git clone https://github.com/sqlcipher/sqlcipher.git
从远端服务器将其 clone 下来,这里推荐放到和上一个文件同一个目录 方便管理
这个就是 sqlcipher 的project code了
第三个
% cd ~/Documents/code/SQLCipherApp % git clone https://github.com/sqlcipher/openssl-xcode.git
这个是我们需要动态编译进工程的文件
至此我们需要的文件 就准备好了
接下来 打开你的工程进行配置,
(这里我是自己单独写了一个工具用来加密并生成!后面会附上我的源码)
1.将你下载的3个目录拷贝进你的工程目录
2.点击你xcode的设置页,选择locations ->source trees
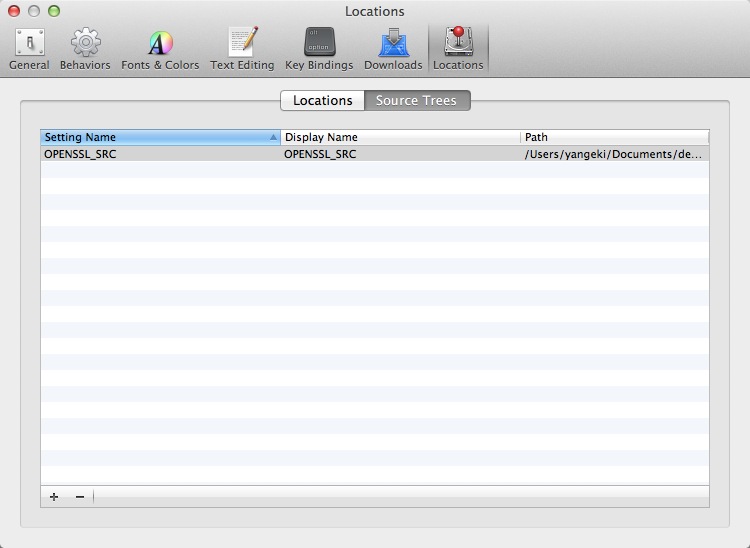
点击+号 settingname and display name 均设为 “OPENSSL_SRC” path设置为你工程目录下openssl-1.0.0e的所在路径
3.添加子项目的引用
将刚才下载的文件里的openssl.xcodeproj 和sqlcipher.xcodeproj (分别在openssl-xcode文件和sqlcipher文件下)添加到你的主工程下,建立引用,直接看图吧!
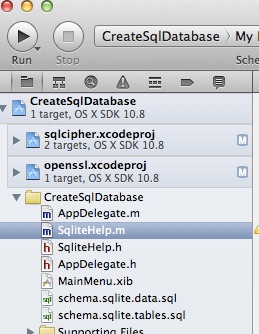
4,接下来 配置编译依赖的库,这是必须的!~
点击你的工程TARGETS 进入build phases ->target dependencies,添加图中的两个项目
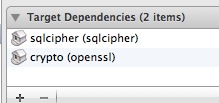
接下来点击同一个页面下的link binary with libraries添加这两个库

至此 还有最后一步,设置编译设置
点击你的工程project->build settings ->搜索architectures进行设置
我这里由于是mac程序看起来会是这样

iOS的话 会是这样
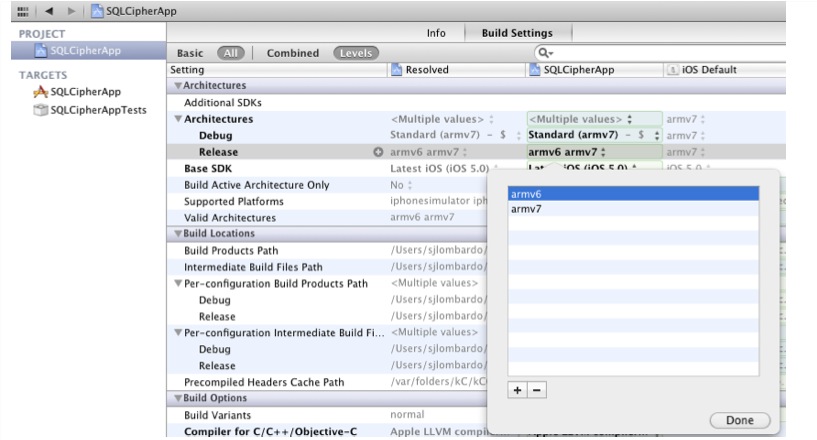
(关于这里的设置,如果又不明白的地方 请google)
接下来 还是在同页面 搜索“other c flags”
进行如下配置
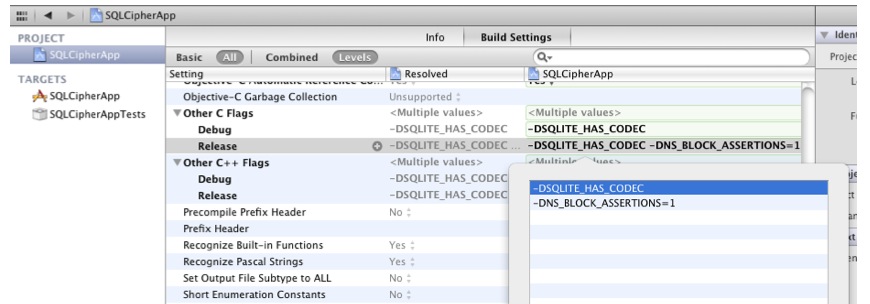
至此整个过程就打工告成了
接下来讲述使用
首先在需要的文件内 import<sqlite3.h>
下面 示范一个 创建or打开数据库的函数
-(BOOL) openDatabase { if (sqlite3_open([[self dataFilePath:DB_NAME] UTF8String], &_database) == SQLITE_OK) { const char* key = [@",66c9a^N" UTF8String]; //数据库文件加密 sqlite3_key(_database, key, (int)strlen(key)); //数据库文件加密 NSLog(@"/n===数据库打开or创建成功===/n"); return YES; }else{ NSLog(@"/n===数据库打开失败===/n"); } return NO; } DB_NAME 是定义的 数据库文件名的宏",66c9a^N" 是你要设置的数据库密钥 sqlite3_key(_database, key, (int)strlen(key));这个方法里就包含了 加解密的过程!~是不是非常简单呢嘿嘿接下来 附上自己的工程 源代码有需要的童鞋,就自己看看吧!里面有详细的注释, 也简单的实现了几个方便数据库操作的函数////////////////////////////////////////////////////////// #import <Foundation/Foundation.h> #import <sqlite3.h> #define DB_NAME @"xxxxxxx.db" //数据库文件名 @interface SqliteHelp :NSObject @propertysqlite3 *database; //数据库句柄 @propertysqlite3_stmt *statement; //sql语句 @property char *errmsg; -(BOOL) openDatabase; //打开数据库 这个函数一般不直接调用,而是直接调用对数据库操作的函数 -(void) closeDataBase; //关闭数据库 这个函数一般不直接调用,而是直接调用对数据库操作的函数 -(NSString *) dataFilePath:(NSString *)fileName; //返回数据库存储路径 这个函数一般不直接调用,而是直接调用对数据库操作的函数 /** * 说明: 给定一个SQL语句 插入或者编辑一个数据 * 语句格式 : * 插入:[insert (文件名)values(data1, data2, data3, ...);] * 编辑:[update(文件名) set (字段名)=(修改后的数据) where(字段名)=(修改前的数据);] */ -(BOOL) insertOrUpdateData:(NSString *)sql; -(NSMutableArray *) getUsers; //以数组的形势,获取所有用户 -(int) getCountOfDatabase; //获取当前数据库的数量 @end //////////////////////////////////////////////////// #import "SqliteHelp.h" @implementation SqliteHelp @synthesize database =_database; @synthesize statement =_statement; @synthesize errmsg =_errmsg; -(BOOL) openDatabase { if (sqlite3_open([[selfdataFilePath:DB_NAME]UTF8String], &_database) ==SQLITE_OK) { constchar* key = [@",66c9a^N"UTF8String]; //数据库文件加密 sqlite3_key(_database, key, (int)strlen(key)); //数据库文件加密 NSLog(@"/n===数据库打开or创建成功===/n"); returnYES; }else{ NSLog(@"/n===数据库打开失败===/n"); } return NO; } -(void) closeDataBase { sqlite3_close(_database); } -(NSString *) dataFilePath:(NSString *)fileName { NSArray *paths =NSSearchPathForDirectoriesInDomains(NSDocumentDirectory, NSUserDomainMask, YES); NSString *documentsDirectory = [pathsobjectAtIndex:0]; return [documentsDirectorystringByAppendingPathComponent:fileName]; } -(BOOL) insertOrUpdateData:(NSString *)sql { if ([selfopenDatabase]) { if (sqlite3_exec(_database, [sqlUTF8String],nil, &_statement, &_errmsg) !=SQLITE_OK) { NSLog(@"/n===插入数据失败===/n"); NSLog(@"/n==sql Error:%s",_errmsg); returnNO; }else{ NSLog(@"/n===插入数据成功===/n"); returnYES; } } sqlite3_close(_database); return NO; } -(NSMutableArray *) seeDatabase { NSMutableArray *users = [[NSMutableArrayalloc]init]; NSString *sql = [NSStringstringWithFormat:@"SELECT * FROM t_relive"]; if ([selfopenDatabase]) { if (sqlite3_prepare_v2(_database, [sqlUTF8String], -1, &_statement,nil) ==SQLITE_OK) { while (sqlite3_step(_statement) ==SQLITE_ROW ) { // User *user = [[Question alloc] init]; int name =sqlite3_column_int(_statement,0); // [user setName:[NSString stringWithUTF8String:name]]; int index =sqlite3_column_int(_statement,1); // [user setId:[[NSString stringWithUTF8String:index] intValue]]; // [users addObject: user]; NSLog(@"%i=%i",name,index); } sqlite3_finalize(_statement); } } sqlite3_close(_database); return users; } -(int) getCountOfDatabase { int count =0; NSString *sql = [NSStringstringWithFormat:@"SELECT * FROM User"]; if ([selfopenDatabase]) { if (sqlite3_prepare_v2(_database, [sqlUTF8String], -1, &_statement,nil) ==SQLITE_OK) { while (sqlite3_step(_statement) ==SQLITE_ROW) { count ++; } sqlite3_finalize(_statement); } } return count; } @end ///////////////////////////////////////////////////////////////// 这里实现 输入sql表 生成数据库,可以在控制台查错 #import "AppDelegate.h" #import "SqliteHelp.h" @implementation AppDelegate - (void)applicationDidFinishLaunching:(NSNotification *)aNotification { // Insert code here to initialize your application [selfbuildDatabase]; [selfinsertDatabase]; } - (void) buildDatabase { NSError *error; NSString *textFile = [NSStringstringWithContentsOfFile:[[NSBundlemainBundle]pathForResource:@"schema.sqlite.tables.sql"ofType:nil]encoding:NSUTF8StringEncodingerror:&error]; if (textFile ==nil) { NSLog(@"Error reading text file. %@", [errorlocalizedFailureReason]); } NSArray *row = [textFilecomponentsSeparatedByString:@";"]; NSInteger count = [rowcount]; SqliteHelp *t = [SqliteHelpnew]; for (int i=0; i<count; i++) { NSString *tempString = [NSStringstringWithFormat:@"%@;",row[i]]; NSLog(@"%@",tempString); [tinsertOrUpdateData:tempString]; } } -(void) insertDatabase { NSError *error; NSString *textFile = [NSStringstringWithContentsOfFile:[[NSBundlemainBundle]pathForResource:@"schema.sqlite.data.sql"ofType:nil]encoding:NSUTF8StringEncodingerror:&error]; if (textFile ==nil) { NSLog(@"Error reading text file. %@", [errorlocalizedFailureReason]); } NSArray *row = [textFilecomponentsSeparatedByString:@";"]; NSInteger count = [rowcount]; SqliteHelp *t = [SqliteHelpnew]; for (int i=0; i<count; i++) { NSString *tempString = [NSStringstringWithFormat:@"%@;",row[i]]; NSLog(@"%@",tempString); [tinsertOrUpdateData:tempString]; } } @end 以上就是本文的全部内容,希望对大家的学习有所帮助,也希望大家多多支持武林网。
新闻热点
疑难解答