关于Laravel就不再多说,关于Laravel的内容可以网上搜索,百科上有很多。接下来让我们用Laravel Resource Controller创建一个RESTful应用吧
开发环境:Windows+XAMPP
代码下载: http://github.com/gmszone/learingphp
编辑器: Sublime Text3(Crack)
转载保留: (转载自Phodal's Blog Phodal's CSDN)
创建数据库迁移php artisan migrate:make create_athomes_table
打开生成的*create_athome_table.php
添加表
<?phpuse Illuminate/Database/Schema/Blueprint;use Illuminate/Database/Migrations/Migration;html' target='_blank'>class CreateAthomesTable extends Migration { public function up() { Schema::create('athomes', function(Blueprint $table) { $table->increments('id'); $table->float('temperature'); $table->float('sensors1'); $table->float('sensors2'); $table->boolean('led1'); $table->timestamps(); }); } public function down() { Schema::drop('athomes'); }}
这里创建了四个表,一个是用于开关控制的led1,以及两个传感器,还有温度传感器
这里要用的是控制器
Route::get('/athome/{atid}',function($atid){ $atdata=Athomes::where('id','=',$atid) ->select('id','temperature','sensors1','sensors2','led1') ->get(); return Response::json($atdata); });创建控制器用下面的代码实现我们称之为Athomes控制器的创建php artisan controller:make AthomesController
就会在app/controllers下面生成下面的代码
<?phpclass AthomesController extends /BaseController { /** * Display a listing of the resource. * * @return Response */ public function index() { // } /** * Show the form for creating a new resource. * * @return Response */ public function create() { // } /** * Store a newly created resource in storage. * * @return Response */ public function store() { // } /** * Display the specified resource. * * @param int $id * @return Response */ public function show($id) { // } /** * Show the form for editing the specified resource. * * @param int $id * @return Response */ public function edit($id) { // } /** * Update the specified resource in storage. * * @param int $id * @return Response */ public function update($id) { // } /** * Remove the specified resource from storage. * * @param int $id * @return Response */ public function destroy($id) { // }}添加类位于app/modals<?phpclass Athomes extends Eloquent { protected $table = 'athomes';}添加到路由打开routes.phpRoute::resource('athome', 'AthomesController');一个简单的输出官方的指导写明了资源控制器的用法| Verb | Path | Action | Route Name |
|---|---|---|---|
echo "Hello,world"
打开浏览器,这里是在XAMPP下开关的也就是
localhost/learingphp/public/athome
会看到输出Hello,World。也就是说athome是直接在Index上的。让我们输出JSON
添加seed打开app/database/seeds/DataSeeder.php,创建两个新的数据class AthomesTableSeeder extends Seeder{ public function run() { Athomes::create(array( 'temperature'=>'19.8', 'sensors1'=>'22.2', 'sensors2'=>'7.5', 'led1'=>False )); Athomes::create(array( 'temperature'=>'18.8', 'sensors1'=>'22.0', 'sensors2'=>'7.6', 'led1'=>False )); }}运行php artisan db:seed输出JSON回到index函数,让我们输出json格式的数据
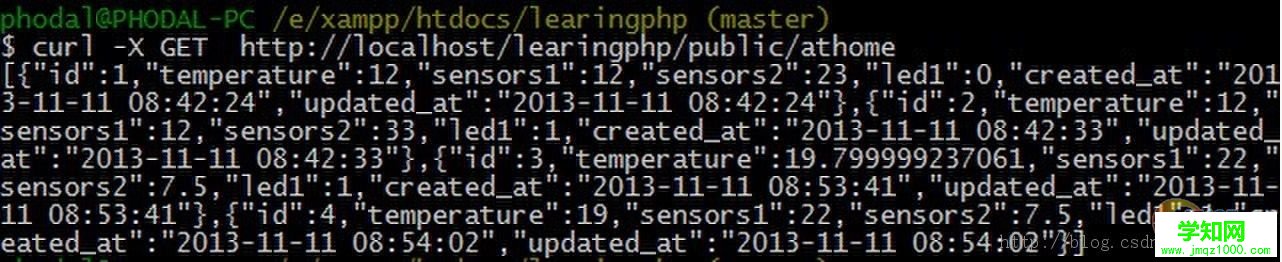
public function index() { $data=Athomes::all(); return Response::json($data); }打开刚才的地址,下面的数据是修改过的
[{"id":1,"temperature":12,"sensors1":12,"sensors2":23,"led1":0,"created_at":"2013-11-11 08:42:24","updated_at":"2013-11-11 08:42:24"},{"id":2,"temperature":12,"sensors1":12,"sensors2":33,"led1":1,"created_at":"2013-11-11 08:42:33","updated_at":"2013-11-11 08:42:33"},{"id":3,"temperature":19.799999237061,"sensors1":22,"sensors2":7.5,"led1":1,"created_at":"2013-11-11 08:53:41","updated_at":"2013-11-11 08:53:41"},{"id":4,"temperature":19,"sensors1":22,"sensors2":7.5,"led1":1,"created_at":"2013-11-11 08:54:02","updated_at":"2013-11-11 08:54:02"}]用curl进行测试,现在不是很必要,不过也不影响我们继续curl -X GET http://localhost/learingphp/public/athome
郑重声明:本文版权归原作者所有,转载文章仅为传播更多信息之目的,如作者信息标记有误,请第一时间联系我们修改或删除,多谢。
新闻热点


疑难解答